You need to connect to a wireless network from Windows command line? Whether it is to impress your friends or to initiate a connection when the network and sharing center not responding, this tutorial will show you how to do that.
![]()
Before you proceed to below commands make sure you open Command Prompt. In order to do that press Win+R on your keyboard, inside Run window type cmd and press Enter on your keyboard. Once Command Prompt window opens up follow steps below:
Step 1: To view the list of wireless networks in range, enter the following command:
netsh wlan show networks

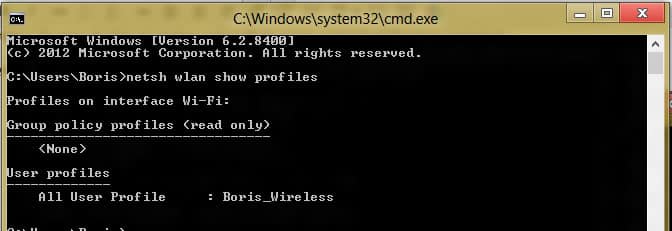
Step 2: To connect to a wireless network, you must have a profile saved on your computer, which means that you must be already logged in the past. To view the list of WiFi profiles registered, enter the command:
netsh wlan show profiles
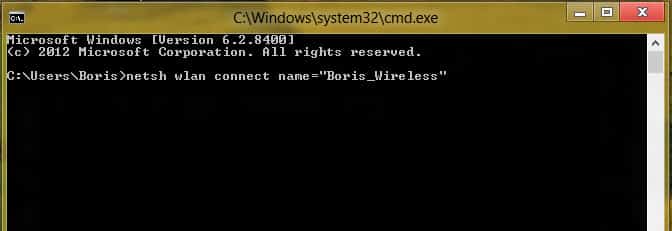
Step 3: After identifying the profile name of the network you want to connect, simply enter the following command to enable the connection:
netsh wlan connect name=”profile name”
[ttjad keyword=”wireless-router”]
![Read more about the article [Tutorial] How To Restrict Access To Windows 7 Without Exact USB Drive](https://thetechjournal.com/wp-content/uploads/2012/02/flash-drive-letter-512x363.jpg)
![Read more about the article [Tutorial] How To Configure Remote Access To Your WD MyBookLive](https://thetechjournal.com/wp-content/uploads/2012/11/settings-mybooklive-as87we9879w87rwerwe.jpg)
![Read more about the article [Tutorial] How To Unmount And Detach VHD or VHDX File in Windows 8](https://thetechjournal.com/wp-content/uploads/2012/10/disk-management-as8d789s7ry1u321o.jpg)
Thank you so much! It works perfectly! but i have just one question, what if i want to connect to a network that is currently available but i haven’t connected to it in the past, hence having no profile saved.. in that case, how would i connect using command line??