If you keep sensitive documents on your computer, your bank accounts or business documents, you better protect them from prying eyes and other users of your computer. Using a free tool called AxCrypt you will be able to restrict access to your sensitive files and folders by protecting them with passwords. In addition, the software includes a feature allowing you to permanently delete a file without it being possible to recover it later. Continue reading this tutorial to find out how to use this tool and protect your documents and folders.
Encrypt Data
With AxCrypt, you have two methods to encrypt files. The first is simply to use a password, not too short or too simple of course so that it is secure. The second method, which is more secure because of 128-bit AES encryption (the same as in banks), is to use a key file that you keep secret, on a USB stick for example. An additional password can also be used for added security.
In both cases, encryption led to the creation of a sealed file with the extension .axx and it is then possible to open with your password and/or your key file. For better security, we recommend creating a key file.
Create Key-File
Step 1: To get started we will need to download and install AxCrypt application on our Windows computer. Once installation was finished you won’t see any icons on your desktop or start menu because AxCrypt is integrated within your Windows.
Step 2: Now place yourself where you want to store your key file (USB drive for example)
Step 3: Create a new folder, for example SecureDocuments.
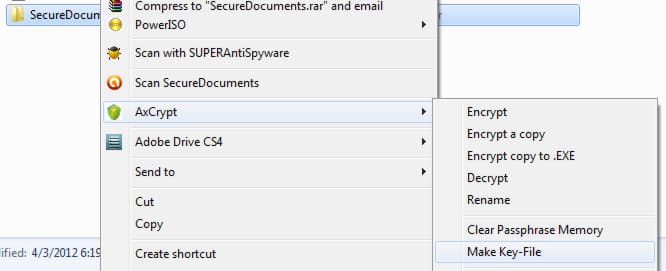
Step 4: Click on that folder with the right mouse button and from context menu choose AxCrypt -> Make Key-File.
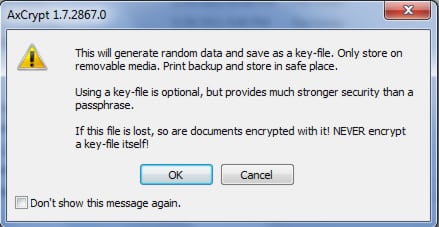
Step 5: Read the warning and click the OK button.
Step 6: The program offers a filename. Click the Save button.
Step 7: Your key file is created.
Encrypt A File
Step 1: Click the right mouse button on the file to encrypt. In the context menu that appears, choose AxCrypt -> Encrypt.
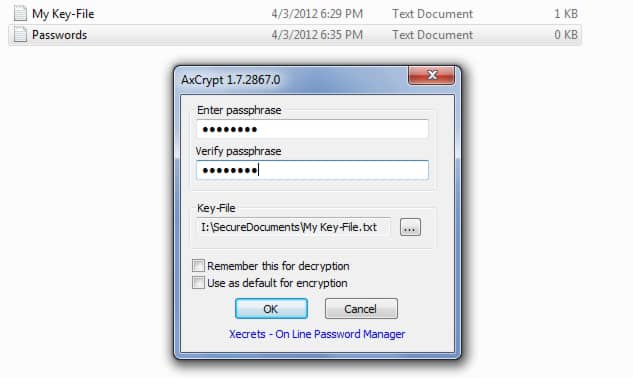
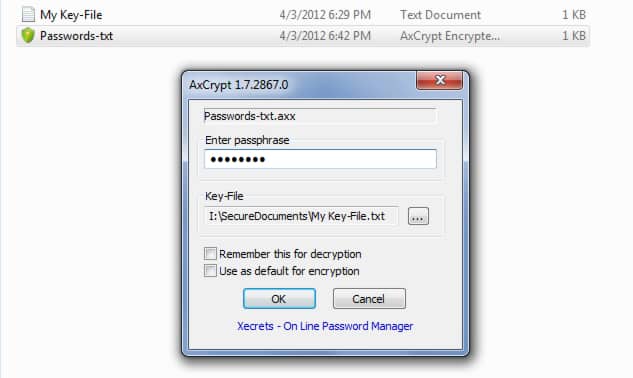
Step 2: AxCrypt a window opens. In the Enter passphrase, enter a complex password. Enter it again in the Verify passphrase.
Step 3: Then click the button … under Key-File section and confirm the warning by clicking the OK button.
Step 4: On your USB drive select file My Key-File.txt (file we created previously) then click the Open button.
Step 5: Then press OK. Your file is protected by AxCrypt.
Step 6: If you want to encrypt all files in a folder with the same password, just right mouse click on that folder and choose the command AxCrypt -> Encrypt.
Decrypt Data
AxCrypt protected files have the extension .axx. They can be copied and moved as you see fit. However, to open an encrypted file or to decrypt, you need the password and key file that you used for encryption.
Step 1: Open an encrypted file. To open an encrypted document, you simply double click it.
Step 2: AxCrypt a window opens. In the Enter passphrase, enter the password you used for encryption.
Step 3: Then click the button … under Key-File section.
Step 4: On your USB drive select file My Key-File.txt and then click the Open button.
Step 5: Then press OK. Your document will then open the program associated with it by default.
Step 6: You can then read your encrypted document and even change it. Normally save it when finished. The encrypted file is immediately updated.
Remove Encryption From A File
Step 1: To remove encryption from a file and then remove its protection, click the right mouse button and from context menu choose AxCrypt -> Decrypt.
Step 2: In the Enter passphrase type the password you used for encryption.
Step 3: Then click the button … under Key-File section.
Step 4: From your USB drive select file My Key-File.txt and then click the Open button.
Step 5: Then press OK. File protection is then removed and the file returns to its original extension. Anyone can then open it again.
Share Sensitive Data
If you send a file encrypted by AxCrypt to one of your correspondent, it cannot open it. For this, he must have AxCrypt installed and have the password that you used. For your convenience, AxCrypt allows you to create a self-extracting encrypted archive. Once you create self-extracting encrypted archive your correspondent don’t need to have the AxCrypt installed on his computer. This will also be practical to take your encrypted files with you. Only people who have your password may open. Here is what you need to do to create self-extracting encrypted archive
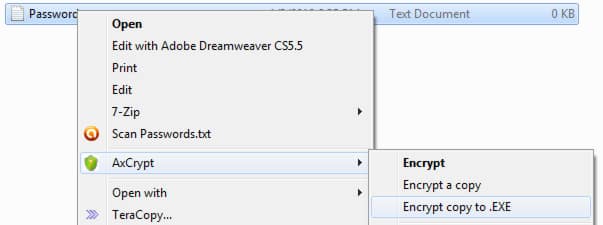
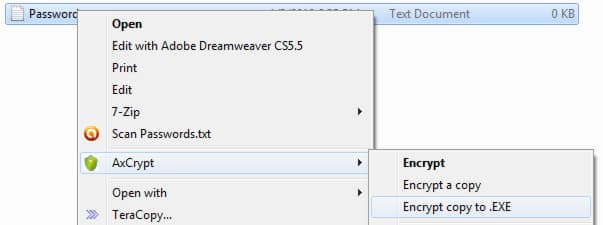
Step 1: Click the right mouse button on the file you wish to convey and choose AxCrypt -> Encrypt copy to .EXE
Step 2: In the window that appears, enter a complex password to protect the file.
Step 3: Confirm the key and click the OK button.
Step 4: A self-extracting archive protected by AxCrypt is created. You can send it to your contacts. Only those with the password you used will open. Note that the original file is not changed or protected.
Step 5: To open the encrypted file, double click the archive extracting.
Step 6: In the window that appears, type in the field Passphrase the password that was used for encryption. Confirm with OK.
Step 7: Then choose a location to save the decrypted file and click the Save button.
Permanently Delete Data
If you think that once emptied the recycle bin, files that were in it are permanently deleted from your hard drive, you are mistaken. Only links to files that are in the file allocation table (FAT) on your hard drive are. Many programs allow quite successfully recover deleted documents. Great if it’s accidental deletion but what will happen if you want to permanently remove sensitive documents, without any possibility of recovery, even by professionals?
Step 1: AxCrypt integrates a feature that allows you to permanently remove sensitive data.
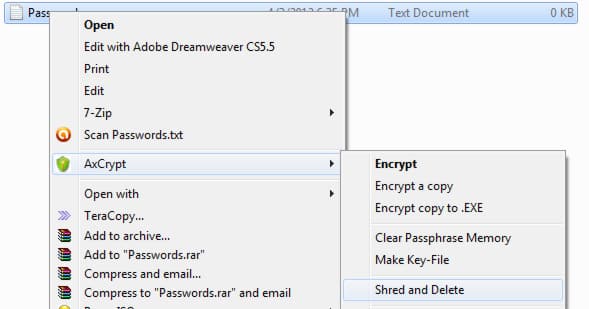
Step 2: Click the right mouse button on the file to permanently delete, then click on AxCrypt -> Shred and Delete.
Step 3: Finally confirm the deletion by clicking Yes.
Step 4: It is then impossible to retrieve your file.
That’s it, you are done. I hope this tutorial will help you to increase your files and documents security on much higher level. Also I would love to hear your opinions about this application and did you faced with any problems while using it.
[ttjad keyword=”all-in-one-desktops”]




![Read more about the article [Tutorial] How To Change Metro Start Menu Background In Windows 8](https://thetechjournal.com/wp-content/uploads/2012/07/settings-as5d4a65sd4.jpg)
![Read more about the article [Tutorial] How To Add Windows 7 Client PC to Windows Home Server](https://thetechjournal.com/wp-content/uploads/2012/03/windows-home-server-logo1-512x210.jpg)