A DLL file stands for Dynamic-Link-Library and its the implementation of shared library concept is designed by Microsoft for their Windows operating systems. These files are used by most of the programs designed for Windows, and they contain data, code and resources with .exe file in any combination. If you have to install some of these files in your Windows computer, this tutorial will show you what procedure you need to follow inside Command Prompt.
![]()
To get started follow the steps below.
Step 1: Before proceeding to below steps make sure you have placed your .DLL file directly on Desktop or inside root of your C:\ drive.
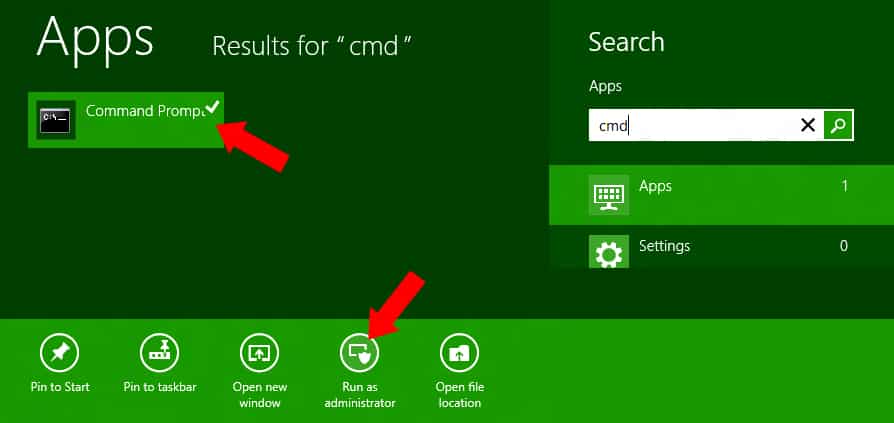
Step 2: On your keyboard press Win+Q to launch Windows 8 App Search.
Step 3: Inside your search field type cmd, right mouse click on Command Prompt icon from search results, and from bottom of your screen choose Run as Administrator.
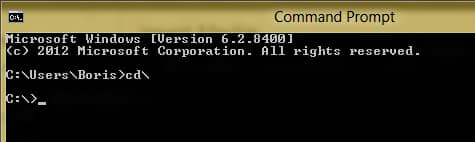
Step 4: When command prompt window opens up you need to open C:\ root directory where we have placed our .DLL file. To do that, inside command prompt type cd\ and press Enter.
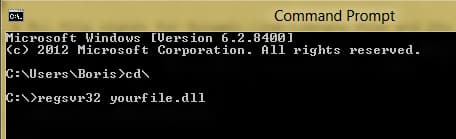
Step 5: Now simply type regsvr32 yourfile.dll and press Enter on your keyboard. Make sure that you replace yourfile.dll with the actual .DLL file name you want to install.
Step 6: You should see a notification window pop-up with message DLLRegisterServer in yourfile.dll succeeded which means that you have successfully installed your .DLL file.
You can repeat above steps for any other .DLL file which you want to install in your Windows computer. Note that this procedure can also be applied to Windows Vista and Windows 7.
[ttjad keyword=”microsoft”]
![Read more about the article [Tutorial] How To Check Security Processes In Your Windows](https://thetechjournal.com/wp-content/uploads/2012/05/windows-processes-security-window.jpg)
![Read more about the article [Tutorial] How To Change Keyboard On Android](https://thetechjournal.com/wp-content/uploads/2015/01/CKA_1-432x768.png)
![Read more about the article [Tutorial] How To Manually Update Windows 8](https://thetechjournal.com/wp-content/uploads/2012/10/settings-as465s4d6a5s4d65a4s6d4a.jpg)