Earlier, I wrote a tutorial on how to root Galaxy Note 10.1 using CF-Auto-Root without custom recovery. That tutorial was intended for beginners. If you are an advance user, and you also wish to root your Samsung Galaxy Note 10.1, create Nandroid backups or, install custom ROMs then this tutorial is intended for you.
![]()
Before proceeding further, let me note that the method described below will work on both versions of Galaxy Note 10.1 (WiFi and 3G) which are running Android 4.0.3, or 4.0.4, or 4.1.1. Now, to get started continue to the following steps.
Step 1: First, you need to download all necessary files from this link and then extract it in new folder on your computer. Inside this archive you will find three files. One of them is ODIN which we are going to use as flashing tool, second one is custom recovery which we are going to inject using ODIN, and third file is super user file that will flash the custom recovery.
Step 2: Now, connect your Galaxy Note 10.1 device with your computer and then mount Galaxy Note’s internal SD card.
Step 3: Copy CMW.SuperSU-v0.94.zip file into your Galaxy Note 10.1 internal memory.
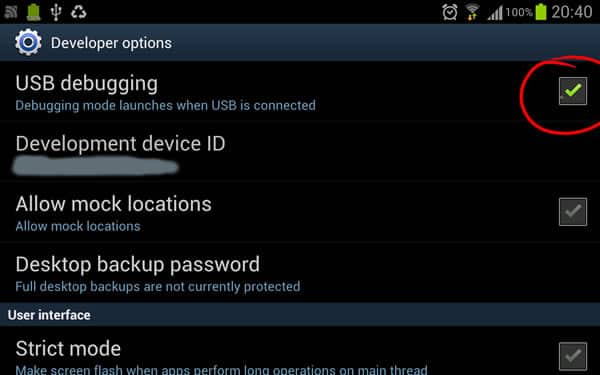
Step 4: On Your Galaxy Note 10.1, go to Settings and then choose Developer options. In here, make sure that the USB debugging option is enabled.
Step 5: Reboot your device in download mode by pressing and holding down the Volume Down button and Power button at the same time.
Step 6: On your computer launch ODIN with admin privileges and wait for couple of seconds until it recognize your Galaxy Note 10.1.
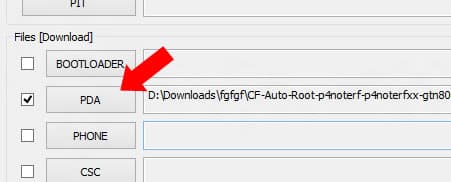
Step 7: Click PDA button and load the third file from the package you downloaded, which in my case was HighOnAndroidCWMRecoveryGTN8000.tar
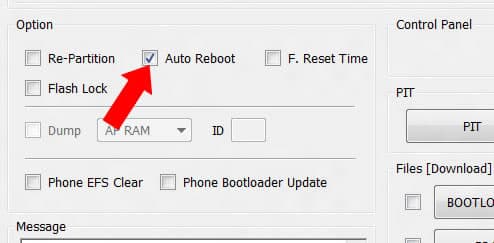
Step 8: Under Options section make sure that the check box in front of Auto Reboot is selected.
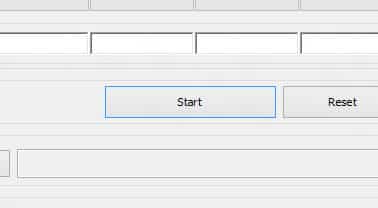
Step 9: Click Start button to inject ClockworkMod custom recovery.
Step 10: After your Galaxy Note 10.1 reboots completely, disconnect it from computer and then reboot in ClockworkMod recovery. In order to do that press and hold Volume up and Power buttons together until you see Samsung logo on the screen. Once Samsung logo appears release Power button, but continue holding Volume up button until you enter into ClockworkMod recovery.
Step 11: Now, use Volume up and Volume down buttons and navigate to Install zip from SD card and then select choose zip from SD card.
Step 12: Select the file CWM-SuperSU-v0.94.zip which you have uploaded to your SD card in Step 3 in order to flash it.
Step 13: Once the file is successfully flashed, reboot your Galaxy Note 10.1 and it will be rooted.
Good luck applying the method to root your Galaxy Note 10.1.
[ttjad keyword=”samsung-galaxy-tab”]

![Read more about the article [Tutorial] How To Install Flash ClockworkMod Touch Recovery On Your Android Devices](https://thetechjournal.com/wp-content/uploads/2012/02/rom.png)