Suppose, you have two or more devices that you want to connect to the internet simultaneously, but your LAN cable or wireless modem can be connected to only one device at a time. You don’t have any Wi-Fi router either. What to do? If you are using Windows 8, then you can simply connect your PC to the internet and share the connection over the air with other devices. This tutorial will show you the process.
To get started follow the steps below.
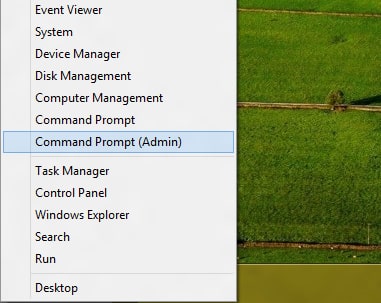
Step 1: At first, you will need to create an access point in your Windows 8 PC. To do that move the mouse to the bottom left corner of your screen.
Step 2: Right-click in there, and from the context menu choose Command Prompt (Admin).
Step 3: If you got prompted by UAC click Yes.
Step 4: Then enter the following command: netsh wlan set hostednetwork mode =allow ssid=”<enter a name of you choice>” key=”<enter an authentication key of your choice>”.
SSID is the name you want to give to your access point, and the key is a password which you want to use to protect your connection. Note that we will be using WPA2-PSK (AES) encryption.
Press Enter on your keyboard to confirm the command and close the Command Prompt window.
Step 5: From now on, whenever you want to share your internet connection over the air, you must start the access point. This has to be done because, whenever you turn off your computer, the access point is stopped. To turn on the access point, move your mouse pointer to the bottom left corner of your computer screen. Right-click on your mouse and from the context menu click on Command Prompt (Admin).
Step 6: Enter the following command netsh wlan start hostednetwork to make your access point visible to people with who you want to share your internet connection.
Step 7: If you want to check and see if its working, type this command netsh wlan show hostednetwork inside Command Prompt window and press Enter on your keyboard. This command will also gives you information on clients which are connected to your wireless access point.
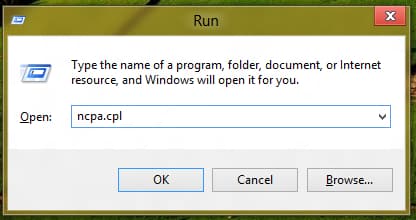
Step 8: Now, you need to enable sharing your internet connection with devices that connect to the access point. Note that this operation will be performed only once in the configuration and after that your settings will be automatically reused. To do that press Win+R on your keyboard.
Step 9: Inside the Run window that opens up, type the command ncpa.cpl and press Enter on your keyboard.
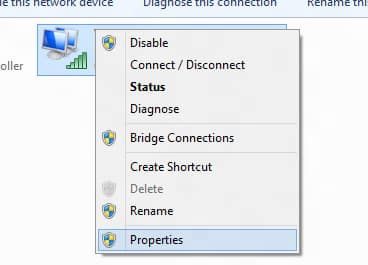
Step 10: Right-click on the icon of the connection you are using on your computer to connect to the internet, and from the context menu that shows up click on Properties.
Step 11: When new window opens up open the Sharing tab.
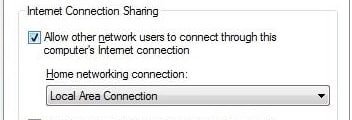
Step 12: Select the checkbox in front of Allow other network users to connect through this computer’s internet connection.
Step 13: From the Home network connection drop-down menu, select the connection which corresponds to your access point.
Step 14: Uncheck the box next to the Allow other network users to control or disable the shared internet connection option, and click OK to save your changes.
Step 15: Now, on another device or computer, you should notice your newly created access point. Simply select it and when asked for password enter the one you selected in Step 4 under value Key.
Visit our Windows 8 tutorial section for more tips and tricks.
[ttjad keyword=”wireless-router”]


![Read more about the article [Tutorial] How To Correct Files Errors On Your USB Drive](https://thetechjournal.com/wp-content/uploads/2012/10/usb-drive-file-error-check-ttj-logo-512x279.jpg)
![Read more about the article [Tutorial] How To Speed Up File Transfers In Windows](https://thetechjournal.com/wp-content/uploads/2012/02/files-transfer-512x290.jpg)
![Read more about the article [Tutorial] How To Rearrange Your Keyboard Layout With SharpKeys](https://thetechjournal.com/wp-content/uploads/2013/01/keyboard-buttons-replace-ttj-logo-512x219.jpg)
Ok, I tried to do this using Windows 7, and I managed to create a network okay. But, I can’t connect to it using another device. My access point shows up, but I can’t connect to it. Any ideas?