If you have Samsung Galaxy Note Smartphone you probably have some old version of Android operating system and you made a decision to upgrade it? No worries, TheTechJournal got you covered, and in this tutorial I will show you how to install Ice Cream Sandwich on your Samsung Galaxy note in few easy to follow steps and enjoy all new features that this version of Android offers.
To get started follow steps below
Step 1: Before we get started we will need to download and install few applications for Windows. First download Odin from this link and add it in separate folder naming it Odin
Step 2: Next download Samsung Kies drivers from this link and again add it in new folder naming that folder Kies
Step 3: Last download will include Samsung Galaxy Note ICS firmware which you can download from this link. Once you download it extract it inside same folder where you added Odin in Step 1
Step 4: Now turn off your Samsung Galaxy Note smartphone and once it’s safely powered off, press and hold volume down key, the home button and the power button at the same time. Hold these buttons together for few seconds, and once you see Warning message release those buttons
Step 5: On your phone press the arrow up button and wait until you see Android logo with message Downloading…
Step 6: Now it’s time to connect galaxy note to your desktop computer or laptop using USB cable. If this is first time you are using Samsung Kias with your computer it will ask you to install drivers. Simply point it to the folder where you can download Kias drivers in Step 2. If you did use Samsung Kias before and already installed drivers skip this step.
Step 7: Now on your computer go to Odin folder you created in Step 1 and double click on Odin3 v1.85.exe file to start the application (Odin3 v1.85.exe may be different on your computer, depending on which version of Odin you have downloaded)
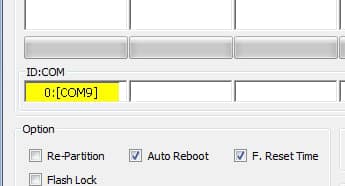
Step 8: Make sure that the first box named ID:COM is yellow, which means your Samsung Galaxy Note is connected with your desktop computer or laptop
Step 9: Now click on PDA button located somewhere at the middle of the window (see image below)
Step 10: From the window that opens locate and open the file which you have downloaded in Step 3. This file should have extension .tar.md5
Step 11: We are done with all adjustments and settings, now simply click Start button to start the update process
Step 12: All you have to do now is to wait until firmware is installed fairly quickly which in my case took around 8 minutes.
Step 13: Once installation is finished your Samsung Galaxy Note will restart and the update process is done. Enjoy in your Samsung Galaxy Note running under Ice Cream Sandwich which bring a lot of new features which you can find at following page.
Step 14: If you want to make sure that your Samsung Galaxy Note is really running under Ice Cream Sandwich go to Settings and scroll the options all the way to the bottom. From here choose About phone and you should see that your Android version is 4.0.3
If you face with any problems or have any suggestions leave them in comment section below.
[ttjad keyword=”samsung-galaxy-tab”]


![Screenshot_2012-07-01-17-51-45[1]](http://thetechjournal.com/wp-content/uploads/2012/07/Screenshot_2012-07-01-17-51-451.png)
![Read more about the article [Tutorial] How To Hide a ZIP File Inside an Image](https://thetechjournal.com/wp-content/uploads/2012/10/zip-in-image-win-ttj-logo-512x219.jpg)
![Read more about the article [Tutorial] How To Adopt Internet Explorer 9 Look In Firefox](https://thetechjournal.com/wp-content/uploads/2012/02/ff-ie9-512x294.jpg)

does it work on NI717R model?
yes, it should work on that model too