Everyone is familiar to System restore feature in windows, specially in XP. It’s an useful feature. Windows System Restore is an awesome system recovery tool. It’s the ideal solution when your pc are full of buggy software. It simply rolls you back to a previous point in time. If you’ve still got a bad taste in your mouth from the lackluster XP version of System Restore, it’s time to take a look at it again if you’ve upgraded to Windows 7 or Vista.
Lowell of LifeHacker wrote the steps to restore the system of your windows pc. His source was HowToGeek.com. Thanks to both of the authors of the sites. Here is the complete guide to Windows system restore.
System Restore in Windows 7 Is Better than XP
If you’ve ever tried the XP variety of System Restore, the uselessness of it probably left a bad taste in your mouth. Setting a system restore point was often agonizingly slow, and when it came time to actually attempt a system restore, it rarely did what you wanted it to do. But if you’ve upgraded to Vista or Windows 7, you should really give System Restore another chance.
Back in the XP days, system restore simply used a file filter and copied files around, but since Vista, it uses the Shadow Copy features built into Windows—essentially, Windows can create a snapshot of your drive as of a certain point in time, which can then be used later to restore your PC should anything go wrong. The Shadow Copy feature is also used by backup software to take snapshots of files even while they are in use, and it powers the Previous Versions feature built into the Professional and Ultimate version of Windows. Using Shadow Copy instead of simple file copying makes System Restore much more effective and comprehensive—while the XP version only could really roll back from certain Windows changes and generally didn’t work that well, System Restore in Vista or Windows 7 can actually roll back to a previous version of an installed application.
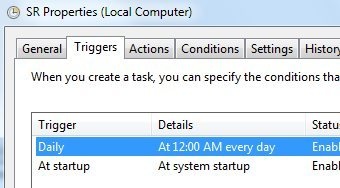 System Restore snapshots are automatically created on a periodic basis using a Task Scheduler job, triggered at system startup and at midnight each day. Before you start to think it’s a contributing factor to your system boot speeds, the Conditions tab specifies that it won’t actually start until the PC has been idle for more than ten minutes—and if you don’t like the schedule, you can tweak the Task Scheduler job to run more (or less) often. When you install (or uninstall) a piece of software, a new System Restore point is also triggered, or snapshots can be created manually if you’re about to make a change and want to be sure that you can roll back.
Create a Manual System Restore Snapshot
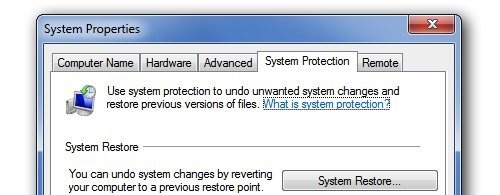
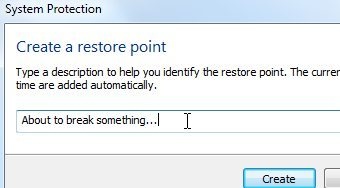 If you’re going to be making changes to your system, like upgrading drivers or tweaking settings, you should create a snapshot before you do anything, so if it all goes horribly awry, you can roll it back to normal. If you’re using Windows 7, just use the System Protection tab in the System Properties window—or you can search for “create restore point” to get there directly. Once you’re there, click the Create button, type in a descriptive name for the restore point, and then let it run—it shouldn’t take longer than a few seconds. If you’re a fan of the step-by-step walk-through, we’ve written up a quick guide to manually creating a System Restore point over at How-To Geek.
If the manual method is too many steps for you, you can make a shortcut that creates a system restore snapshot in a single step without having to go through any other steps. Regardless of the method you choose, you should make a point of creating system restore snapshots before you start doing any major tweaking on your PC.
Restoring from a System Restore Snapshot
 All these snapshots don’t do you much good if you don’t know how to restore your PC using them, and it’s just as easy as creating a snapshot. While you can restore from a snapshot by simply finding the System Restore screen in Control Panel, you’re not going to have a lot of luck actually using the snapshot unless you’ve restarted your PC into Safe Mode. Normally, you can just restart your PC and hit the F8 key really quickly right when Windows is starting up, which will show you the boot menu and allow you to choose to boot into Safe Mode, but if you have problems triggering this, I’ve previously written up a guide to force Windows to boot into Safe Mode using the msconfig utility.
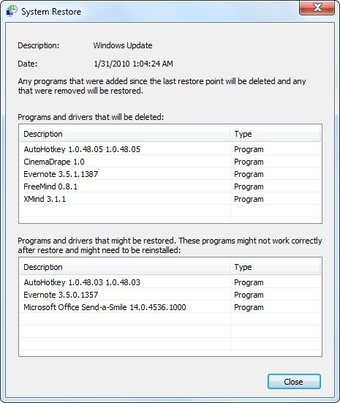 Once you’re in Safe Mode, head into System Properties –> System Restore or just search through the Control Panel to pull up the wizard, choose the restore point that you’d like to roll back to, and then choose Next to start the restore process. If you’re not sure which one to choose, however, you can select a restore point and click the Scan for Affected Programs button, which will analyze the restore point to figure out what applications will be rolled back if you choose that restore point.
You should note that System Restore isn’t going to roll back your documents, it’s just going to operate on internal operating system files, program files, and system settings. If you had a document on your desktop, it shouldn’t be removed, but if you roll back to before you install an application, the shortcut to that application would probably go away.
If your PC won’t even boot, you should also note that you can access the System Restore features from the Windows installation disc, which can be very helpful when you’ve completely broken your PC.
There’s No Performance Drain From System Restore
 One of the most common performance-tweaking myths that you’ll find on all the amateur tweaking sites says that you should disable System Restore for maximum performance, but that’s just ridiculous. We’ve already shown you that System Restore only kicks in once a day, and only runs when the system is idle—so the only drain on your resources is a little bit of extra drive space being used, not to mention that snapshots take virtually no time to create.
If you’re really worried about the use of your drive space, you can easily tweak System Restore to use less space in Windows 7—just head into System Properties –> System Protection –> Configure and drag the slider to choose exactly how much space you want to use. For Windows Vista, it’s a lot more difficult—you’ll need to use a command-line hack to force Windows Vista to use less space.
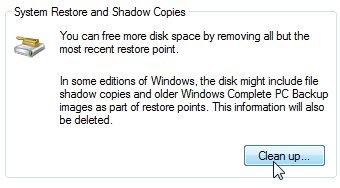
The much better solution, however, is to simply clear out all restore points but the most frequent one whenever you’re in need of some extra drive space using the Disk Cleanup utility. Just run it as administrator by right-clicking on the utility in the start menu and choosing the Run as Administrator option, or you can open it normally and click the “Clean up system files” button—once you’ve done so, you can choose the More Options tab where you’ll find a Clean up button to remove all the old restore points except for the most recent one. This keeps you safe just in case you need to restore, but doesn’t keep the older, more unnecessary restore points around.
At this point hopefully you can see the benefit and learn to love how System Restore can fix your PC easily, but if you really insist, you can disable System Restore easily from the System Protection tab.
Source: LifeHacker, HowToGeek


System Restore snapshots are automatically created on a periodic basis using a Task Scheduler job.
That’s a great list. Thank you very much!
Your article teaches me how to restore my system, thank u!