There are plenty of new features that Microsoft have implemented inside Office 2013 and one of them is possibility to export your Word or Excel documents into PDF format and also to add a password protection. In this tutorial I will show you how to add that in few easy steps.
To get started follow steps below
Step 1: Open the document which you want to save to PDF.
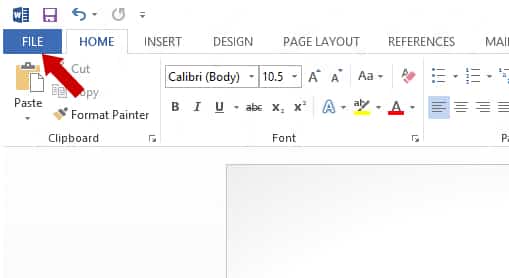
Step 2: Click File menu located at top left corner of your screen.
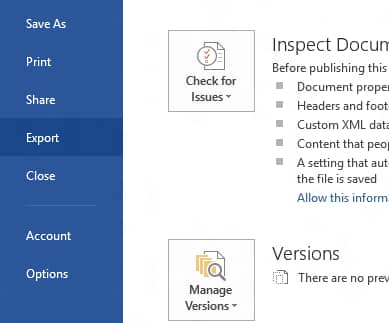
Step 3: A new window will show up where from in the left pane click on Export.
Step 4: Now select Create PDF/CPS Document and then click on Create PDF/XPS button.
Step 5: Type in a name for your PDF file and under Optimize for choose the PDF quality.
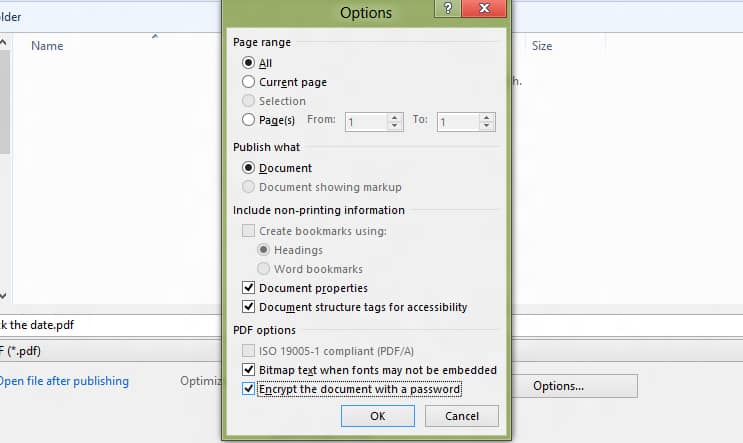
Step 6: Now choose Options button and a new window will open.
Step 7: In this window you will be able to select the page range you want to use for PDF, but also non printing information included in your PDF document.
Step 8: Now one of the options we are gonna use in here is password protection. To add it to your newly created PDF document, select the checkbox in front of Encrypt the document with a password.
Step 9: Once you click OK a pop-up window will show up asking you to type a password which you want to use to protect your Word document. Once you done click OK to save it
Step 10: Click Publish and your Word document will be saved in PDF and also protected with password
Your are done! Next time when you try to open previously created document a password will be required.
[ttjad keyword=”microsoft”]


![Read more about the article [Tutorial] How To Enable Restrictions In iOS To Secure Your Device](https://thetechjournal.com/wp-content/uploads/2012/03/ipad-password-enter-512x359.jpg)
![Read more about the article [Tutorial] How To Enable Sleep Mode On WD MyBookLive](https://thetechjournal.com/wp-content/uploads/2012/10/mybooklive-system-tray-a8s7e9w87r9w87t98wre.jpg)
![Read more about the article [Tutorial] How To Change Keyboard On Android](https://thetechjournal.com/wp-content/uploads/2015/01/CKA_1-432x768.png)