Subversion (SVN) clients are open source version control software that many developers use to keep every revision of important or frequently changing files. You can think of Subversion as a database of your files where each time you make a change to a file or group of files, you can commit those changes to your Subversion repository. If you are not satisfied with those changes you can use Subversion to compare your current version with any previously committed version and choose the one you like. There are many different Subversion applications out there that work under Windows and in this tutorial I will show you how to run Subversion under Apache in Windows 7.
To get started follow steps below
Step 1: First we will need to download latest version of Apache from this web site. Since you are probably using Windows operating system make sure you download Win32 Binary installer. Once download is completed install it on your computer. Installation will be quick and simple making sure you do not change anything and keep all default values.
Step 2: Now let’s download Subversion for Windows and install it on our computer. Visit this web site, scroll down all the way to the bottom of that page and download the installer for Windows. Again install it on your computer and leave all settings by default, don’t change anything.
Step 3: Now we are gone need a Subversion client for Windows, in my case I will suggest you to use TortoiseSVN. You can download it from this web site and install it on our computer. This installation is also straightforward; just accept the defaults and don’t change anything.
Step 4: Now we will need to edit our Apache, for that open Windows Explorer in follow this path C:\Program Files\Apache Group\Apache2\conf\httpd.conf and backup httpd.conf file before we start making some changes. Once you have done that, open httpd.conf file sing Notepad and then at the end of what’s already inside add following lines of code
# Configure Subversion repository
<Location /svn>
DAV svn
SVNPath “C:\svn”
AuthType Basic
AuthName “Subversion repository”
AuthUserFile “c:\svn_conf\passwd”
Require valid-user
</Location>
Step 5: Save httpd.conf file with changes we just made and if you Apache is running restart him
Step 6: While having your Windows Explorer still open go to your C drive and create two folders. First one name svn and second one svn_conf
Step 7: Now we are gone create our first repository. For that open Windows Explorer and then go to root of your C drive.
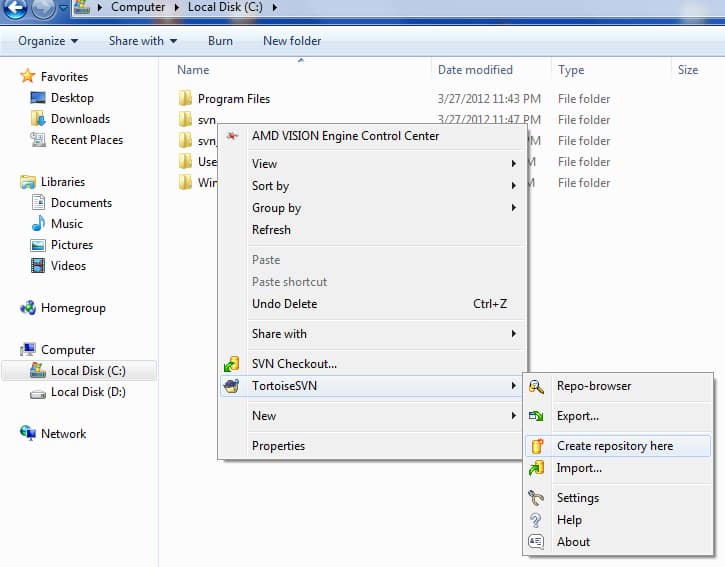
Step 8: Right mouse click on svn folder which we created in Step 6 and from context menu choose Create repository here…
Step 9: Now if TortoiseSVN ask you what kind of repository do you want to create. We are gone select Native filesystem (FSFS) and click OK, if it didn’t asked you anything proceed to next step
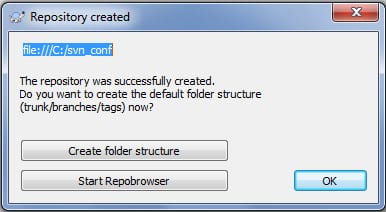
Step 10: You should get a message “The repository was successfully created”
Step 11: Now this repository is useless if it’s empty, so let’s see how to import the directory of files that you want to keep under version control. For that right mouse click on your folder who’s content you want to control (in y case this would be WordPress 2.0) and from context menu chose TortoiseSVN -> Import
Step 12: Inside URL of repository add the path to your svn folder which should be c:\svn and click OK.
Step 13: All your files from this folder will now be imported into your Subversion repository at c:\svn
Step 14: Now if you are a web developer like I am and you maybe did added a WordPress or any other CMS older version inside Subversion repository you can easily access to this older version by starting Apache and then opening your web browser and typing http://localhost/svn in address bar
Step 15: Now you can repeat above steps starting from Step 11 and add any other Subversion you want
I hope this gave you just an idea how awesome tool this can be for every web developer or web designer, because it can easily help you to test your theme or script in many different versions of WordPress, Joomla, Drupal or any other CMS. I would love to hear your opinions about this so make sure you leave your impressions in comment section below.
Follow us on Twitter or be a Fan on Facebook or Subscribe On our News Feed for free to get regular update.


![Read more about the article [Tutorial] How To Disable Auto Photo Download In Windows 8 Mail App](https://thetechjournal.com/wp-content/uploads/2012/11/settings-mail-app-asd584897ye87t.jpg)
![Read more about the article [Tutorial] How To Enable Spotify’s New Web Player](https://thetechjournal.com/wp-content/uploads/2012/11/respotify-profile-name-asd.jpg)
