If you are working on text article which runs between several people, it is common that each author makes changes, add text, delete paragraphs, insert comments, etc…. Using the Review Mode in Microsoft Word, you can track all changes made to your document and their authors. At first, you must ensure that your name is well defined in Word which will help you to easily identify your contributions. After enabling Review mode for Microsoft Word document, you can then send your article to another author who can change it. Each person who is holding the document can edit the document and leave comments. Once the new document is in your possession, you can easily identify which changes are made by which author. And if each reviewer has made changes at the same time, you can easily combine them into a single document. You can then accept or reject each change to produce your final document. Although this maybe sounds too complicated it’s not and in this tutorial I will show you how easily you can master this awesome tool available in Microsoft Word.
Check his signature
Any changes you make on the text will be signed with the name you reported to the installation of Word. To check the name and change it if necessary, you should change options in Word.
Step 1: Launch Word.
Step 2: Click the Office button and then click Word Options button.
Step 3: In new window from left navigation choose Popular tab and under section Personalize your copy of Microsoft Office, enter your user name and initials.
Step 4: Confirm with OK. This name will be displayed next to the changes you make.
Activate Review
After enabling Review Mode to track changes to documents, revisions will be visible in the text. To avoid disrupting the layout, you should display them in bubbles; here is how to do that.
Step 1: In Word 2007, open the document to be annotated.
Step 2: Open the Review tab of the Office Ribbon.
Step 3: Click the Track Changes button to activate this feature.
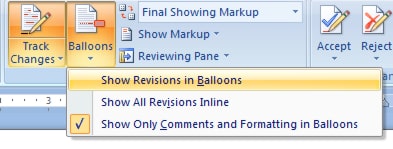
Step 4: Then click the button Balloons and from dropdown menu select Show Revision in Balloons.
Work on the text
You can now edit the text as usual. Any changes you make are put on hold: the original text, additions and deletions are all well preserved.
Step 1: The text you add is colored red and underlined.
Step 2: The text that you request to delete is struck, but not erased.
Step 3: If another user works on this same document, its changes will be identified by a different color.
Show contributions made by each person
Microsoft Word allows you to see all changes made by each person individually. Here is what you need to do
Step 1: Open the Review tab of the Ribbon Office.
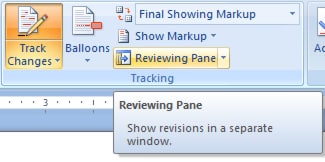
Step 2: Under Tracking heading, click on Reviewing Pane
Step 3: The window that opens to the left shows a list of all changes, with their authors
Combine multiple revisions of a document
You have sent your document to multiple reviewers and many of them have made changes. Microsoft Word allows you to recover all changes and combine them into a single document. Then it will be easier to accept the changes.
Step 1: Open the Review tab of the Ribbon Office.
Step 2: In the Compare section, click the Compare button and then click Combine.
Step 3: In the Original document, click the Search button and select the original document on your hard disk.
Step 4: Under Label unmarked changes with enter your name
Step 5: In the Revised document, click the Search button and select the document you got from other reviewer.
Step 6: Under Label unmarked changes with enter name of reviewer
Step 7: Then click the OK button. A new document is created, a combination of your original document and changes in the second document. All changes are indicated.
Step 8: To combine the result with the revision of another reviewer, save the combined document to your hard drive and combine it with the document. And so on for all revisions to be included within a single document.
Commit the changes
Once you have disposed of each reviewer changes within a single document, you must accept or refuse to get your final document.
Step 1: Click on the first portion of text being edited (marked with different color).
Step 2: Now go to Review tab and under changes sections click Accept to accept the change or Decline to reject it.
Step 3: Next and Previous buttons let you move a selection to another change.
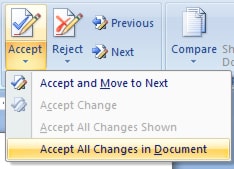
Step 4: To accept or reject all changes at once, click the arrow button under Accept or Decline and choose Accept (or Decline) all changes in document.
Step 5: Similarly, you can browse the various comments inserted by the individual authors by clicking the Previous and Next buttons to the Comments box.
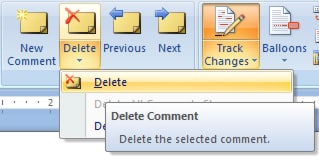
Step 6: To delete a comment, simply click the Delete button.
Step 7: When your document is finished, you can finally turn off Track Changes by clicking the corresponding button on the Review tab. The upcoming changes will no longer be followed.
[ttjad keyword=”microsoft”]


![Read more about the article [Tutorial] How To Find Out If Your Computer Is Compatible With Windows 8](https://thetechjournal.com/wp-content/uploads/2012/11/run-win8-upgrade-avisor-as5d6465w4r6e4wer-512x305.jpg)
![Read more about the article [Tips] How To Use Gmail Advanced Search Parameters](https://thetechjournal.com/wp-content/uploads/2012/11/gmail-search-tips-ttj-logo-512x218.jpg)
![Read more about the article [Tutorial] How To Convert Any Videos Using VLC Player](https://thetechjournal.com/wp-content/uploads/2012/07/vlc-c1.jpg)