You can never be too cautious when it comes to Online Security. The same is true for any consumer electronic products, such as your Laptop. If you have your personal laptop, you should always keep it password protected. But you are better off disabling the password feature if you have to share a Windows Device with others. This might happen in an office environment or while you are doing a group study.

If you have multiple accounts on your Windows Device, you can disable password protection for any of them using the following steps. This way you are keeping one Account open on your Device for Public Use. This might come really handy in cases when you have to share your Windows Device with others.
Remove Windows 10 Password from Control Panel
- Launch Control Panel. From there click on User Accounts. Make sure on your Control Panel Pop-Up, View by setting is on Categories. Otherwise, you won’t see the User Accounts Settings.
- After you click on the User Accounts option, hit the Make changes to my account in PC settings option.
- From the Side Panel hit the Sign-in options.
- Scroll Down until you see the Password Section, from there hit the Change Button.
- Type in your Current Password and hit Next.
- From the next Pop-Up, don’t fill up any of the fields, just simply hit the Next button.
- That should be it. Exit the Settings Window.
Disable Password For All Accounts
You might have multiple Accounts on your Windows Device. There is nothing wrong with it. And chances are all the Accounts are Password Protected. In that case, if you intend to remove the Password from all the Accounts, you will have to do it individually. That’s a time-consuming task.
Moreover, if you have an old Windows Device which you will use for personal use from now on, you don’t need Multiple Accounts. A single Account should suffice. In both cases, if you go and remove Password individually from all the Accounts, you will end up spending a lot of time at something which is super repetitive.
But who said you would have to do it individually. You can disable the Password Option for all Accounts on your Windows Device from one place and with very simple steps.
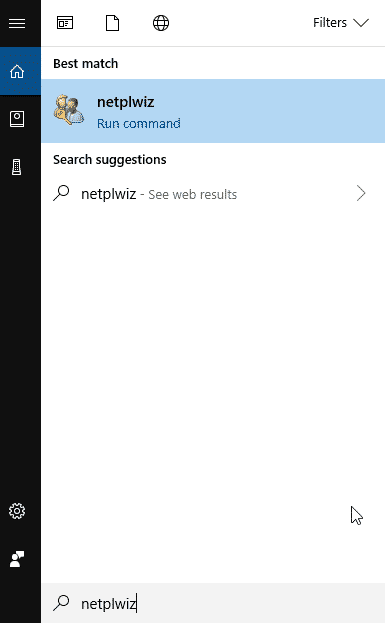
On the other hand, if you want to remove the Password for a device that only you use, you have to follow another method. First, click on the Windows 10 Start Menu. Type in Netplwiz and select the program that appears.
This will launch the User Account Pop-Up. From here, you can make a handful of adjustments to all Accounts on your Windows Device and their Passwords. Right at the top of the pop-up, you will see a checkbox labeled “Users must enter a username and password to use this computer”. Uncheck the Box and hit the Apply button at the bottom of the pop-up.
This will ask you for your current Password. Enter the password twice and that should be it. From now on, whenever you restart your Windows Device it will not ask for a Password.
Wrapping Up!
So now you know how to disable Password for All accounts or certain accounts on your Windows Device. If for any reason you have to again enable the password for accounts on your Windows Device, first click on the Windows 10 Start Menu. The next steps are similar to the ones you followed while disabling the Password for Windows. After you have launched the Start Menu, type in Netplwiz and select the program that appears. Right at the top of the pop-up, you will see a checkbox labeled “Users must enter a username and password to use this computer”.Check the Box and hit the Apply button at the bottom of the pop-up. This should enable the Password for every Account that had password protection earlier.