Telephony software Skype and instant messengers can be controlled using keyboard shortcuts. The keyboard shortcuts are used to gain speed in using the software but also making it much easier to use for those that don’t have mouse near them e.g. people with laptops. In this tutorial, I will explain you how to enable these shortcuts and modify them on the way you like it.
Enable Skype keyboard shortcuts available by default
Step 1: Launch Skype and login,
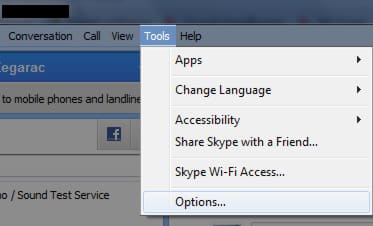
Step 2: In top navigation, click Tools and then choose Options. Then select Advanced tab and choose Hotkeys.
Step 3: In the Keyboard Shortcuts window, check Enable keyboard shortcuts.
You can now use keyboard shortcuts in Skype available by default. These shortcuts allow you to Answer call, Ignore call, Hang up, Mute microphone, etc…
If you wish, you can go further by configuring these shortcuts. To do this, follow below steps.
Customize the keyboard shortcuts available in Skype
Step 1: In top navigation, click Tools and then choose Options. Then select Advanced tab and choose Hotkeys.
Step 2: In the Keyboard Shortcuts window, select the desired shortcut and click Change selected shortcut button.
Step 3: Enter keyboard key combination you want to use to perform this action and click OK to save changes.
Step 4: Go back to Options and do not forget to check your shortcut to make it active. Finally, click Save.
Now you know how to customize keyboard shortcuts available in Skype.
[ttjad keyword=”desktop-computer”]


![Read more about the article [Tutorial] How To Copy DVD Movies To The Kindle Fire](https://thetechjournal.com/wp-content/uploads/2012/12/open-disc-a5s465w4r65e465w4.jpg)
![Read more about the article [Tutorial] How To Share Your Internet Explorer Bookmarks Between Several Computers](https://thetechjournal.com/wp-content/uploads/2012/10/ie-bookmarks-share-ttj-logo-512x211.jpg)
![Read more about the article [Tutorial] How To Delete Skype Account](https://thetechjournal.com/wp-content/uploads/2012/02/skype-delete-account-512x288.jpg)