When you want to protect a certain folder in Windows the first options that comes to your mind is folder encryption or adding a password. Although this protection can be quite good, the need to enter a password positively shouts the message that someone is trying to hide something. Although you definitely should not put password protection on side and avoid it, there is one more thing you can do to make your folder more secure and that would be invisibility. To make your folder invisible in Windows 7 you don’t need any commercial tools, you can simply use existing Windows 7 feature which can make your folder invisible and that’s what are we gone show you in this tutorial.
To find out how to use Windows “hidden” attribute on folders follow steps below:
Step 1: Click Start menu, go to Documents and from here locate the folder you want to hide
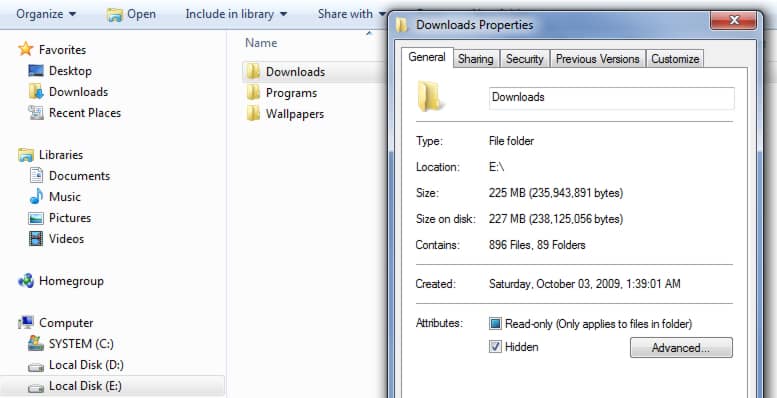
Step 2: Right click on that folder and choose Properties
Step 3: Go to General tab, check the field Hidden and click OK to save changes.
Step 4: You folder will not disappear from My Documents and won’t be visible to anyone. If it’s still visible then you have Windows Explorer configured to display hidden files, continue to Step 5 then.
Step 5: Click Start menu and go to Control Panel
Step 6: From top right corner of your Control Panel choose Large Icon View
Step 7: Now click Folder Options
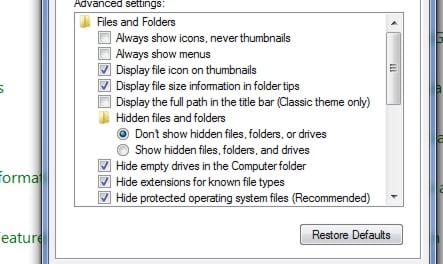
Step 8: Got o View tab and under Advanced settings, click Don’t show hidden files, folder, or drives and then click OK to save changes.
Step 9: If you folder was visible after Step 4, now it will be invisible for sure.
Now you probably wonder how I can see that folder by myself. Here is how:
Step 1: From above steps repeat Step 5, 6 and 7
Step 2: Go to View tab and under Advanced settings, click Show hidden files, folders, and drives, and then click OK.
Step 3: Once you are done editing or uploading new files to your folder don’t forget to hide it again.
[ttjad keyword=”all-in-one-desktops”]


![Read more about the article [Tutorial] How To Stop Android From Adding Apps Icons To The Home Screen](https://thetechjournal.com/wp-content/uploads/2012/07/a5s4d14asd.jpg)
![Read more about the article [Tutorial] How To Make Windows 8 Boot Straight To Desktop](https://thetechjournal.com/wp-content/uploads/2012/12/create-basic-task-882s2s883s2d498e7rxc.jpg)