As many of you already know Windows 8 Consumer Preview is finally out an available for download. Many of you will also want to try and install it on your computer but before you even start an installation you should however take some basic precautions. Do not upgrade your current Windows to Windows 8 Consumer Preview! First, because Windows 8 Consumer Preview is a beta, it still has some bugs and may change before the final release. Second, the upgrade to Windows 8 will perhaps cause some problems with programs and settings your current Windows has. A priority, if you have Windows 7 and you do the update, you will not lose anything and Windows 8 will probably work without any problems because these two systems are quite similar. However, if you’re running Windows XP or Vista there are no guaranties that you won’t face with compatibility problems.
Whatever your current version of Windows is I recommend that you install Windows 8 Consumer Preview in a partition or on a separate hard drive in order to have a dual boot which will include your existing Windows and new Windows 8 Consumer Preview. I recommend you to create a partition with size of at least 25GB and then start your installation. Then you can simply specify that you want to install Windows 8 Consumer Preview on partition but more about that I will cover in below steps which you need to follow in order to install Windows 8 Consumer Preview.
Windows 8 Consumer Preview Installation Preparations
Step1: To get started visit Microsoft official website and download Windows 8 Consumer Preview. A small 5MB installation file will be downloaded.
Step 2: The file which we just download is not a Windows 8 Consumer Preview but a tool that will help us get started with installation. Run this file and wait for few minutes until it check apps and devices compatibility.
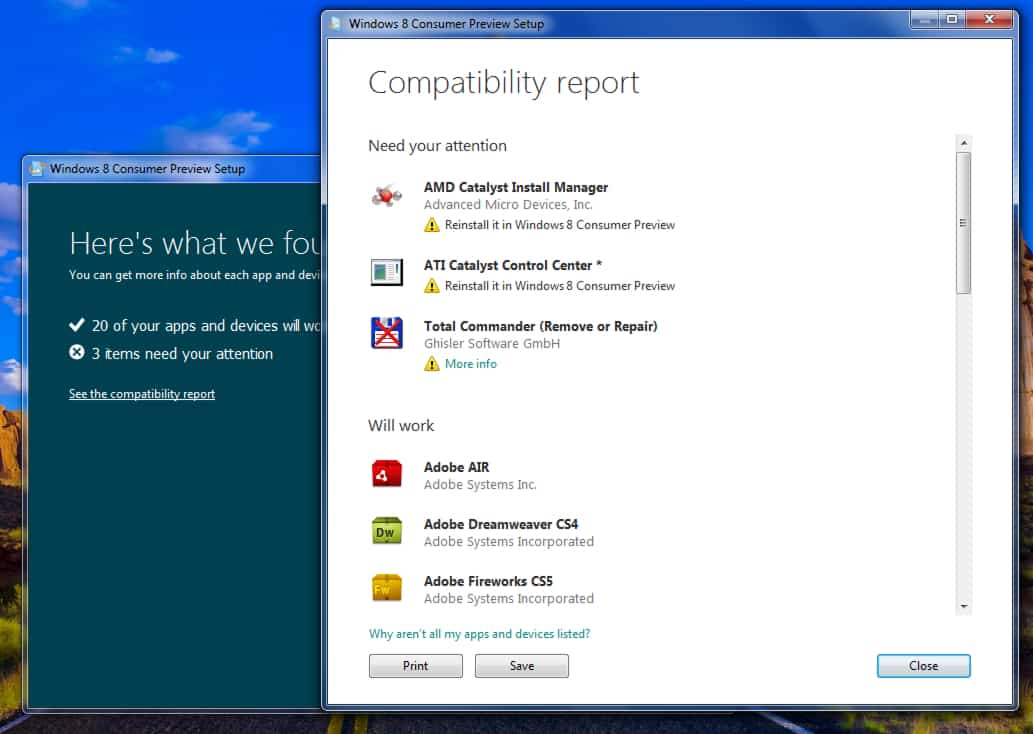
Step 3: Once the compatibility test is finished you should get the compatibility report results which will tell you which of you apps and devices will work under Windows 8 Consumer Preview and which of them need your attention. As you can see from below screenshot I had problems with 3 items which are ATI Catalyst Install Manager, ATI Catalyst Control Panel and Total Commander. All other programs I have in my computer will work just fine. But since we will be installing Windows 8 Consumer Preview on different partition it really doesn’t matter if these programs are compatible with Windows 8 as long as we meet minimum system requirements. To continue click Next button
Step 4: Now we will be notified that tool is ready to download Windows 8 Consumer Preview and it will give us a product key. Make sure you write down this product key in case we need it later during installation. Click Next button to continue.
Step 5: Windows 8 Consumer Preview will now start downloading and depending of your connection speed it may take some time since download size is around 2.5GB. You can at any time click Pause download process and resume it later on. Once download process is completed continue to Step 6.
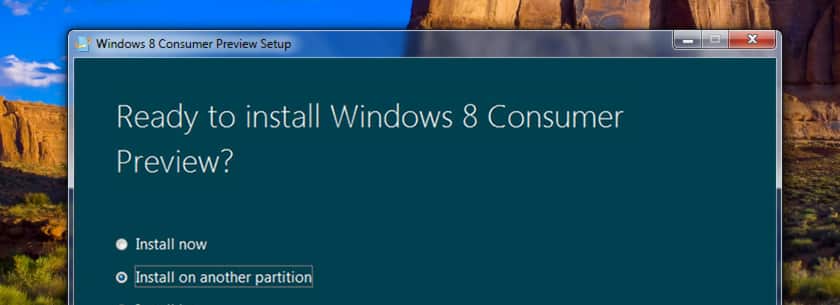
Step 6: In new window select Install on another partition and click Next
Step 7: Now it ask us what media we want to use and we have 2 options. Choose USB Flash Drive (make sure you USB Flash drive is larger than 3GB) and click Next
Step 8: Now select your USB drive from the list, click Next and confirm that you want to continue by clicking Yes
Step 9: Your USB drive will now be formatted which will probably take few minutes. Once its finished click Next, enter your Product key and click Finish. Your setup will close.
Step 10: Now since we will install WCP on different partition we need to create one. If you already have one click here to continue reading, however if you don’t have another partition and don’t know how to create it continue following next steps.
Step 11: Open Windows 7 Start menu, inside search field type partition and press Enter on your keyboard.
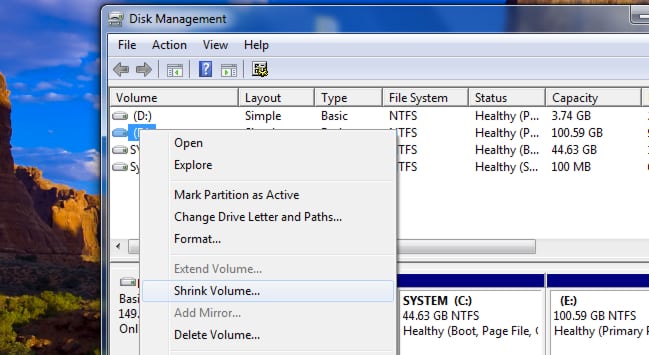
Step 12: Disk management window will open where you can see all available drives and partitions in your computer. From here right click on drive where you have most of free space and from context menu choose Shrink Drive…
Step 13: Wait for few seconds and then choose how much you want to shrink the partition. The size you see in here is read out in MB (Megabytes), so if we need a size of 30GB we will enter 30000. Once you are finished click Shrink.
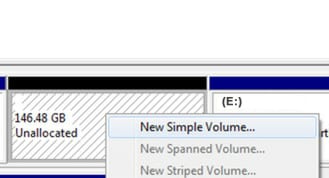
Step 14: Now we have create a new partition where we want to install our Windows 8 Consumer Preview. Inside Disk Management you will now notice a new partition called ‘unallocated’. Right click on it and from context menu choose New Simple Volume
Step 15: Click Next, leave these values at default and click Next
Step 16: Leave drive letter as it is and then click Next.
Step 17: In next screen select Format this volume with following settings, change volume label to something reasonable e.g. Win8CP and once you are done click Next
Step 18: Formatting wizard will now ask you to confirm your changes and your partition is now fully ready for WCP installation. Let’s install Windows 8 Consumer Preview!
Windows 8 Consumer Preview Installation
Step 1: To get started with installation be sure your USB flash drive with Windows 8 Consumer Preview is plugged in and restart your computer.
Step 2: Watch your screen carefully. See which key you need to press on your keyboard to enter the BIOS (it’s usually an ESC, F8, DEL) and choose to boot from USB flash drive where your Windows 8 Consumer Preview is located.
Step 3: Click Install Now button
Step 4: Windows installation will start and it will ask you what language you want to choose. Click Next to continue on that language.
Step 5: Now you need to enter your product key you got earlier and click Next
Step 6: Agree with license terms and click Next
Step 7: Now we want to choose what kind of installation we want. Since we are installing our Windows 8 Consumer Preview on different partition, from this window we will choose Custom: Install Windows Only (Advanced)
Step 8: Select the partition we created earlier. If you did followed my steps above this partition name should be Win8CP, if you did named it different choose that one then and click Next. If you partition does not appear in this list click Refresh and it will be visible.
Step 9: From here entire process is automatic so don’t turn off your computer or do any changes because your computer will restart few times. After first restart you will notice the option to choose from Windows 7 or Windows 8, don’t choose anything and let Windows 8 Consumer Preview install.
Step 10: You will know that your Windows 8 Consumer Preview was installed when you see a screen called “Personalize“. Enter your computer name and background and click Next.
Step 11: Choose your Wireless connections and settings.
There you go! You have successfully installed your Windows 8 Consumer Preview. Enjoy it and let us know about your first impressions in comments below.
[ttjad keyword=”all-in-one-desktops”]


![Read more about the article [Tutorial] How To Export or Import Your Contacts From Gmail](https://thetechjournal.com/wp-content/uploads/2012/10/contacts-gmail-asd798as7da3a213465s4df.jpg)
![Read more about the article [Tutorial] How To Print From Your Nexus 7](https://thetechjournal.com/wp-content/uploads/2012/07/cloud-print-action-as8d7a6sd32.jpg)
![Read more about the article [Tutorial] How To Remove ‘Shortcut’ Word and Arrows From Your Icons In Windows](https://thetechjournal.com/wp-content/uploads/2012/10/uwt-start-sd8897f1gd32f1g32df1.jpg)