Most webmail services support the transfer of emails to desktop messaging software such as Microsoft Outlook, Windows Mail or Thunderbird. Although this procedure in certain desktop application can be quite hard to understand, in this tutorial I will show you how to configure POP account in Microsoft Outlook 2007 and what information’s you need to enter so you can establish a connection with web server.
In this tutorial, POP was selected for greater compatibility between messaging services – although some of them also support IMAP protocol. To get started follow steps below.
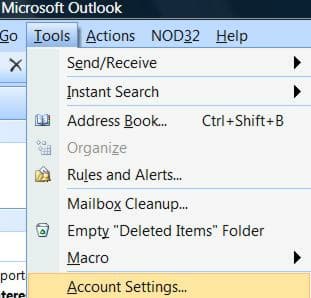
Step 1: Start by opening Outlook 2007. Then open the Tools menu and click Account Settings…
Step 2: A window opens. Choose E-mail tab and then click New to start the wizard where you can configure a new account.
Step 3: Choose a E-mail service by selecting Microsoft Exchange, POP3, IMAP or HTTP and click Next.
Step 4: The second step is one that will retain most of our attention. Follow the instructions carefully to avoid mistakes in filling the various fields:
- Name: enter your name or nickname;
- Email address: enter your full e-mail;
- Password: Enter the password that you normally use to log into your Webmail;
- Confirm password: re-enter the password previously entered;
Step 5: To confirm all click Next.
If you have not made any mistakes, the connection to the mail server should be established. Finally, send yourself a test email to ensure proper operation of your POP account and do not forget to read your emails.
[ttjad keyword=”android-phone”]


![Read more about the article [Tutorial] How To Bypass the Pattern Lock on Any Android Device](https://thetechjournal.com/wp-content/uploads/2012/12/android-pattern-lock-bypass-ttj-logo-512x267.jpg)
![Read more about the article [Tutorial] How To Enable Safe Mode in Windows 8](https://thetechjournal.com/wp-content/uploads/2012/07/win-8-safe-mode-512x226.jpg)
