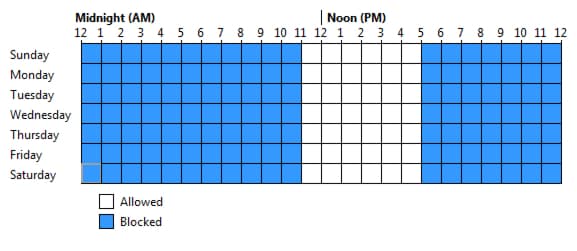
If from some reason you want to time limit access to Windows 7 to certain people who use your computer (maybe your children or workers in your office), the simplest way to do that is using integrated Windows 7 tool called Parental Control. No matter how many user profiles you have in your Windows you can easily time limit each profile individually. In this tutorial I will show you how to do that.
To get started follow steps below
Step 1: Click Start menu and choose Control Panel
Step 2: From top right corner of your screen choose Large Icon View and then from below results select Parental Controls
Step 3: Click on the user you want to set time limit access. Let me note that you cannot set time limit access to your (administrative) account.
Step 4: If you didn’t turned on Parental Control for that profile select On, enforce current settings and click OK to save changes
Step 5: Go to Parental Control and select same profile again
Step 6: Now, under Windows Settings you should see option/link Time Limits, click on it
Step 7: You should see a grid with dates, days and hours for specific month
Step 8: Simply click on white box and once it become blue user won’t be able to access to its account during that time. By clicking on blue box again you will remove limitations.
Step 9: Once you are done with settings click OK to save changes and close Parental Control window.
There you go! Now you know how to turn on Parental Control and time limit user access to Windows 7
[ttjad keyword=”microsoft”]


![Read more about the article [Tutorial] Install Android Lollipop 5.0.2 On Windows](https://thetechjournal.com/wp-content/uploads/2015/08/android-1-512x226.jpg)
![Read more about the article [Tutorial] How To Install nitoTV And XBMC Easily On Your Apple TV 2](https://thetechjournal.com/wp-content/uploads/2013/01/nitoTV-and-XBMC-1-512x333.jpg)
![Read more about the article [Tutorial] How to Jailbreak Your iPhone 4 On iOS 5.1 Using RedSn0w – Mac OS X](https://thetechjournal.com/wp-content/uploads/2012/03/iphone-4-jailbreak-logo-512x259.jpg)