Frame interpolation is a hot topic these days, and you may not exactly know what this technology is all about. Weblog Tested has an easy-to-follow guide that you can use to turn your ordinary PC in a 120Hz HDTV! With just a little bit of software and a whole lot of patience, you can apply the same effect to your own video files without spending the extra money on a new TV.

While it is technically closer to what we see in real life, a lot of people are so used to watching video at 24 frames per second, that faster frame rates seem “fake” to them. Part of this is likely because the smoother motion is somewhat similar to what we see in soap operas (a lot of people describe it as the video looking like it’s going 1.5 times faster, but actually moving at actual speed). If you haven’t tried watching movies at a faster frame rate, or if you’re already a fan but don’t want to shell out for a 120Hz television, you can enable motion interpolation on your PC. But keep in mind that you will need at least a dual core processor to get this work at at least 720p.
Step-by-step guide
- Install the K-Lite codec pack you just downloaded. There’s no need to change anything, as the defaults should all be fine. Install AVISynth as well.
-
 Setting up Media Player Classic
Now we’re going to install ffdshow. The K-Lite pack already installed a copy, though we’re going to reinstall it to make sure everything’s in its right place. This time you’re going to make sure that VFW is unchecked while all AVISynth options are checked during install.
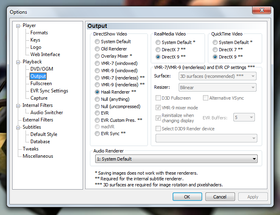
- K-Lite includes an application called Media Player Classic which we’ll be using to playback our videos. Open it, and go to View > Options. Click “Internal Filters” and uncheck everything. Next, you’ll want to navigate to “Output” which is nested under the “Playback” section. Change the direct show video renderer to Haali.
Save your settings, restart Media Player Classic, and test a video file of your choice. If a number of icons, including ffdshow, appear in your system tray, then you’ve set everything up correctly.
-
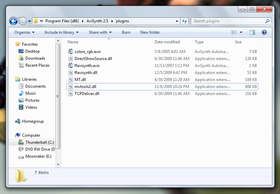 Your Avisynth plugins folder should look like this.
Now for the tricky part. Extract the multithreaded plug-in for AVISynth. If you’re on a 32-bit system, place avisynth.dll in your “..Windows\system32” directory, and the contents of the plugins folder you extracted in “…Program Files\Avisynth 2.5\plugins”. Overwrite any existing files.
If you’re on a 64-bit system, place avisynth.dll in your “…Windows\SysWOW64” directory, and the contents of the plugins folder you extracted in “…Prorgam Files (x86)\Avisynth 2.5\plugins”. Overwrite any existing files.
- Finally, extract the framedoubling plugin MVTools download, and place the mvtools2.dll in Avisynth’s plugins folder – the same directory as in the last step.
-
 How your Avisynth settings in ffdshow should look.
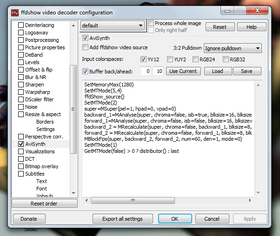
Now we’re going to configure things. From your start menu, open ffdshow’s Video Decoder Configuration and check the AVISynth box on the left. Next, uncheck “Add ffdshow video source”. Beside “Input colorspaces,” the only value that should be checked is “YV12”. Buffer back values should be set to 0/10, though other values (10/10, 0/24) may prove more successful if you experience stuttering.
- Finally, AVISynth relies on a script to carry out frame interpolation on your content. Copy and paste the following into the script box:
SetMemoryMax(1280)
SetMTMode(5,4)
ffdShow_source()
SetMTMode(2)
super=MSuper(pel=1, hpad=0, vpad=0)
backward_1=MAnalyse(super, chroma=false, isb=true, blksize=16, blksizev=16, searchparam=3, plevel=0, search=3, badrange=(-24))
forward_1=MAnalyse(super, chroma=false, isb=false, blksize=16, blksizev=16, searchparam=3, plevel=0, search=3, badrange=(-24))
backward_2 = MRecalculate(super, chroma=false, backward_1, blksize=8, blksizev=8, searchparam=0, search=3)
forward_2 = MRecalculate(super, chroma=false, forward_1, blksize=8, blksizev=8, searchparam=0, search=3)
MBlockFps(super, backward_2, forward_2, num=FramerateNumerator(last)*2, den=FramerateDenominator(last)*1, mode=0)
SetMTMode(1)
GetMTMode(false) > 0 ? distributor() : last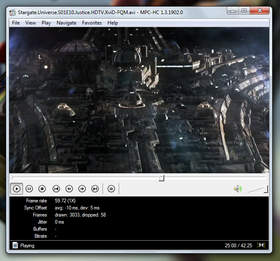 The finished result. Just, you know, with more movement.
This should framedouble your 24fps footage to a nice, smooth 48fps. Save the settings, open up a video in Media Player Classic, and see if everything works! If the changes aren’t immediately noticeable, you can confirm the doubled frame rate by going to View > Statistics. This script should be good for dual-core users, but quad-core owners should change SetMTMode(5,4) on the second line of the script to SetMTMode(5,8) to take advantage of the extra threads. Also, on the third last line, changing mode=0 to mode=2 can improve the smoothing process, but may introduce graphical artifacts on lower-end systems.


It’s a longer process than simply playing your file in VLC, but if you’re a fan of motion smoothing and frame interpolation, it just might be worth it. Give it a try, and let us know what you think!
Source: Tested.

I’ve been using [url=https://www.nothingbuthemp.net/collections/thc-tinctures ]THC Extract for sale[/url] regular for over a month now, and I’m indeed impressed by the positive effects. They’ve helped me determine calmer, more balanced, and less solicitous everywhere the day. My snore is deeper, I wake up refreshed, and uniform my nave has improved. The value is outstanding, and I appreciate the sensible ingredients. I’ll definitely heed buying and recommending them to the whole world I know!
I’ve been using https://www.nothingbuthemp.net/collections/thc-edibles constantly in regard to all about a month for the time being, and I’m indubitably impressed at near the absolute effects. They’ve helped me perceive calmer, more balanced, and less tense everywhere the day. My forty winks is deeper, I wake up refreshed, and straight my focus has improved. The attribute is famous, and I appreciate the sensible ingredients. I’ll obviously heed buying and recommending them to person I be aware!
Did you know your main part is wired to return to CBD? Every human has an endocannabinoid combination (ECS) that influences frame of mind, have a zizz, and unsusceptible response. CBD is sui generis because it doesn’t swathe as the crow flies to receptors like THC does; instead, it encourages the bulk to utilization its own endocannabinoids more effectively. It’s like a tune-up in return your biological signaling, promoting expertness and ease