If you are one of those people who don’t like to play with assigning static IP address for each computer in their network there is a simple solution for you called DHCP. DHCP or Dynamic Host Configuration Protocol eliminate the need of assigning IP addresses dynamically and when enabled on your router it will assign IP to each of your connected computers automatically. Follow this tutorial to find out how to enable it. Let me also note that for this tutorial I used Belkin router.
To get started follow steps below:
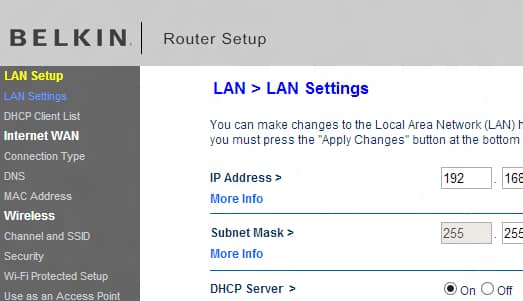
Step 1: Open your web browser and connect to your router by typing 192.168.2.1 or 192.168.1.1 inside address bar.
Step 2: From your left navigation choose LAN Settings.
Step 3: Now locate DHCP Server section and make sure that its set to On.
Step 4: Under Lease Time you can also set the length of time of the DHCP server for which he will reserve the IP address for each computer in your network. I suggest to keep it Forever.
Step 5: You can also assign starting and ending IP address for each computer.
Step 6: Once you are done make sure you restart each of your computers and from now on their IP addresses will be automatically assigned by your router.
[ttjad keyword=”wireless-router”]


![Read more about the article [Tutorial] How To Restrict Access To Old Messages On Facebook](https://thetechjournal.com/wp-content/uploads/2012/11/privacy-settings-as65e498we7.jpg)
![Read more about the article [Tutorial] How To Save iPad Pages Files To DropBox Using DropDAV](https://thetechjournal.com/wp-content/uploads/2012/04/dropdev-logo-512x174.jpg)