A proxy server is a computer or a module that stands between a web browser and Internet. Proxy servers are used to secure and improve access to certain Web pages by storing them in cache. Then when a browser sends a request for a web page that was previously stored, the response time and display are improved. The user accesses the site faster and does not saturate the proxy to exit. Proxy servers also enhance security by filtering out some web content and malware. In this tutorial we will show you how you can create a proxy using Google App Engine.
To get started you will need to have two things: Python Dev Environment which you can find at this website and Google App Engine SDK for Python which you can find here. Install Python Dev Environment and Google App Engine for Python on same computer (installation is quite simple) and then continue to follow steeps below.
Step 1: Go to https://appengine.google.com/start and create your App. Since you are probably creating your first application Google will ask you to verify your mobile number. They will send you are identification code which you just have to type in verification field and you will be verified.
Step 2: In next page add some name for your application “Application Identifier“. To find out if your name is available just click Check Availability. Also save your Application Identifier name somewhere on your computer because we will need that name later.
Step 3: Click the Save button to create your application
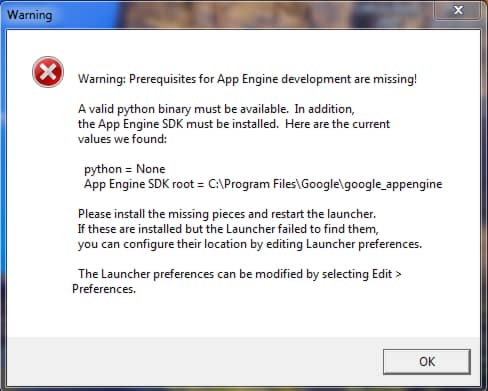
Step 4: Now go back to your desktop or Start menu and start your Google App Engine application which you previously installed. You will probably get an error window because its not able to find the Python and other required programs on your computer so click OK button.
Step 5: Now we will configure Google App Engine. In new window choose Edit and go to Preferences.
Step 6: In new window for Python path add following (its a default path to Python, if you install it somewhere else add that location here) C:\Python\python.exe
Step 7: For App Engine path add following (its a default path to App Engine, if you install it somewhere else add that location here) C:\Program Files\Google\google_appengine
Step 8: For editor specify path to a Notepad which by default is C:\Windows\notepad.exe
Step 9: Once you are done with above settings inside Preferences window click OK.
Step 10: Download this file and unpack it on your desktop.
Step 11: Now go to Google App Engine window (the one we did open in Step 4 and Step 5) click File and choose Add Existing Application
Step 12: Click Browse and located the folder you did downloaded and unpacked in Step 11. Click Add to add it to Google App Engine
Step 13: Now in the list you will see YOUR_APP_ID which you need to replace with your application name. Mark YOUR_APP_ID with left mouse and click big Edit button.
Step 14: Notepad will open with some text in it. In the line where you see application: replace YOUR_ADD_ID with the app name I told you in Step 2 to save.
Step 15: Save Notepad file and close it
Step 16: Now Click Deploy button to deploy this application to your Google App Engine account. You will need to add your login information’s (email and password) which you used to create your Google App Engine account.
Step 17: In next few minutes your application will be deployed
Step 18: Now open the web browser you use and type the address of your proxy server. Address of you proxy server will be proxyservername.appspot.com, simply replace proxyservername with the one you used in Step 2.
Step 19: Now inside input file simply type a website address your want to browse from a proxy server and click Go. You can also this proxy server for many other things so use it wisely.
There you go; you have your own proxy server.
[ttjad keyword=”desktop-computer”]


![Read more about the article [Tutorial] How To Record Music From Any Streaming Site](https://thetechjournal.com/wp-content/uploads/2013/01/music-stream-record-ttj-logo.jpg)
![Read more about the article [Tutorial] How To Speed Up File Transfers In Windows](https://thetechjournal.com/wp-content/uploads/2012/02/files-transfer-512x290.jpg)
wow thank you for this great post, I always use Mozilla to change the proxy, henceforth I intend to use windows to change proxy