When you install a certain software or video game on your computer, folders are created and files are copied to different locations on your hard drive. A lot of different keys are also written in the Windows registry. All of this can make your computer full of junk and it is sometimes hard to keep up the track where everything is located. In this tutorial, I will show you how to keep an eye on what is happening on your computer when you install software or video game and track all changes that are made.
![]()
For this purpose we will be using a free software called RegShot which will allow you to take a snapshot of the registry and system folders of Windows before you make any kind of change such as software or video game installation. Taking a second shot after the installation, RegShot will provide you with a full report on the changes made on your computer and you will have a full overview what was added before installation. Before proceeding to below steps make sure you download the RegShot from this location. No installation is required, simply unpack it on your desktop or separate folder. In there you will see four different files, depending on which Windows version you have, use appropriate lunch file. In my case, since I am using Windows 7 32-bit I will lunch Regshot-x86-Unicode.exe.
Step 1: Before we start the scan we need to configure RegShot app. To do that run RegShot by double clicking its shortcut on the desktop or folder where you have unpacked it.
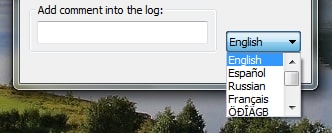
Step 2: If you want to different language then English, scroll down the list and select one you want to use.
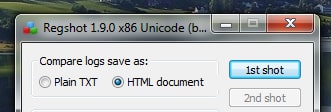
Step 3: Under Compare logs save as select HTML document.
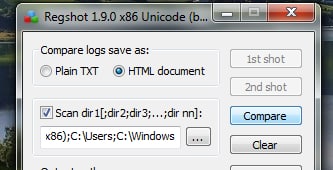
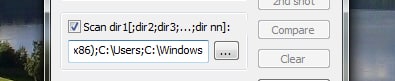
Step 4: Then check the box in front of Scan dir.
Step 5: Enter the following paths in the field below: C:\ProgramData;C:\Program Files;C:\Program Files (x86);C:\Users;C:\Windows
Step 6: Under Output path select the folder where you want to save your snapshots.
Step 7: Now that RegShot is configured, you can use it to take a snapshot before and after software or video game installation. RegShot will provide you with a full report on the changes made to your computer.
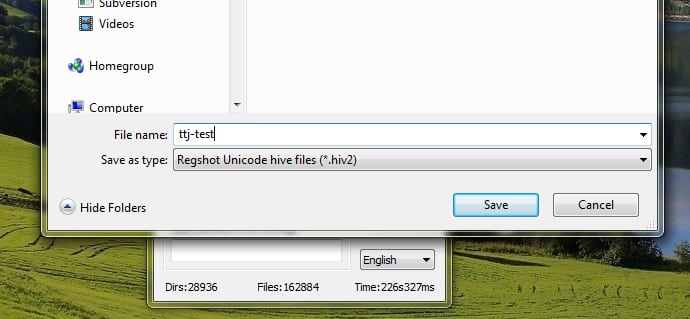
Step 8: When you are planning to install software or game lunch RegShot and then click on the 1st shot button and then choose Snapshot and Save. In this way, your registry is saved and you can restore the registry if you have problems with the software you are installing.

Step 9: Choose location where you want to save your snapshot and click Save. Also make sure you don’t close RegShot window because we will still gone use it to compare snapshots.
Step 10: Now you can start the installation of the software or video game. Once the installation is complete, go back to RegShot and click on the 2nd shot and then choose Shot.
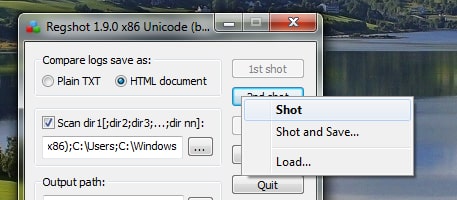
Step 11: Then click the Compare button.
Step 12: The two snapshots are then analyzed. Your default web browser will open up where you can see all differences before and after your software or game installation such as: keys and values added to the registry.
Step 13: The second part of the file lists the files and folders which are created during installation. These snapshots can be very useful because when you are uninstalling the software or video game, you can verify that all the files have been deleted.
Step 14: You can close RegShot app and continue using your install software or video game.


![Read more about the article [Tutorial] How To Easily Reduce Video File Size Before Uploading It To Web](https://thetechjournal.com/wp-content/uploads/2012/11/add-videos-as5d498e7r98y7u.webp)