When we capture video we usually opt for the best quality. But the problem comes up when we need to upload these videos online on websites such as YouTube or Metacafe. These uploads can sometimes take hours. However, re-encoding the videos with lower quality before uploading can reduce the size of video files drastically, and in this tutorial I will show you how to do that with Windows Movie Maker.
Before proceeding, make sure you have installed Windows Movie Maker in your Windows PC. You can download it from Microsoft. Once you have Windows Movie Maker up and running, you are ready to go.
Step 1: Inside Windows Movie Maker, from tools ribbon, click on Add videos and photos and add the video you want to use.
Step 2: Windows Movie Maker offers you to work on some video effects. If you want to use those, apply the effects and then continue to next step.
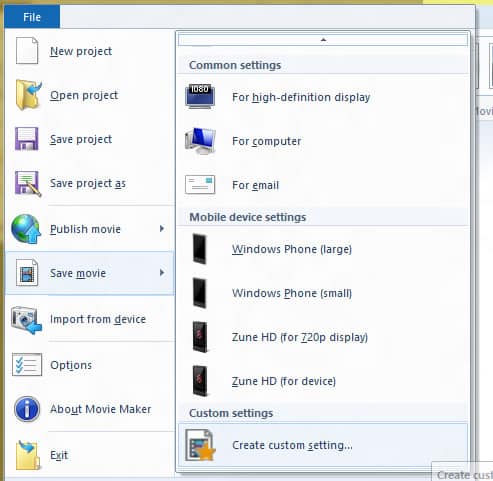
Step 3: Once you are done with effects settings, click on File then hover over Save movie and then click on Create custom settings.
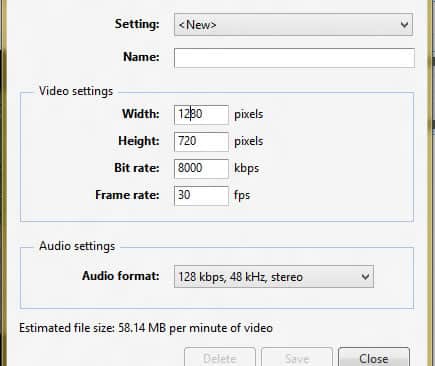
Step 4: A new window will open offering you a variety of audio and video settings.
Step 5: Choose the most optimal width, height, bit rate and frame rate for your video. As you play with the settings, you can see the estimated file size at the bottom of the window.
Step 6: Once you are finally done with these changes, click on Save and wait until your video is saved in new format.
Step 7: Now you can upload it on YouTube, Metacafe or other sites.
Let us know, whether you found this helpful enough or not.
[ttjad keyword=”dslr-camera”]


![Read more about the article [Tutorial] How To Root Samsung Galaxy Note 10.1 Using CF-Auto-Root](https://thetechjournal.com/wp-content/uploads/2013/01/auto-reboot-as54d5e4wr65.jpg)

![Read more about the article [Tutorial] How To Speed-Up Application Search From Windows 7 Start Menu](https://thetechjournal.com/wp-content/uploads/2012/02/start-menu-speedup-512x233.jpg)