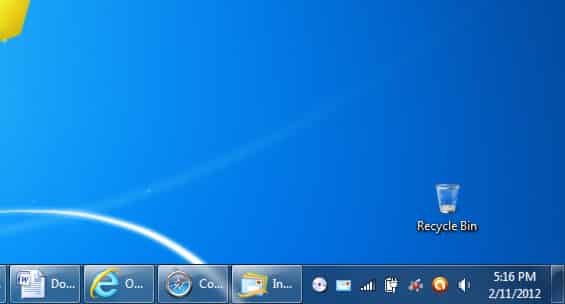
Although Microsoft did a pretty good job in Windows 7 when it comes to taskbar and system tray icons organizations it still can be quite hard to navigate through them when you have plenty of programs active and especially when you screen resolution is small. In this tutorial we will try to give you some useful guides on how to better organize your taskbar and system tray.
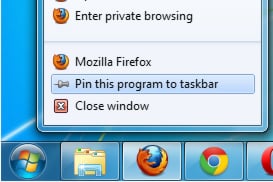
For every Windows 7 user the option to pin items to the taskbar is highly familiar. If you are not familiar with this, to pin items to your taskbar all you have to do is right click to application icon located in your taskbar and choose Pin this program to taskbar (See example from image below). Once your program in pinned it will remain in your taskbar even after you shutdown your computer and turn it on again. To unpin it from taskbar right click on your program icon again and choose Unpin this program from taskbar.
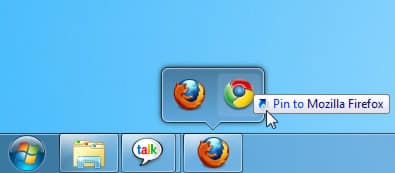
However if you ever had too many items pinned into your taskbar it probably resulted in a lot of clutter. To avoid this problem you can try the program called Bins which will help you to set multiple pinned items together. For example you can join together related programs such as web browsers, instant messengers, email clients, or other similar groups of programs which at the end will give you more space in your taskbar. To be able to groups multiple icons together:
Step 1: Download and install Bins (Shareware Application).
Step 2: Once installed Bins will be located inside your system tray.
Step 3: Now choose pinned item from taskbar and place it over another pinned program icon.
Step 4: Repeat step 3 for every icon you want to group
Unfortunately Bins is not free application and if some of you don’t have money to pay for it you still have another option to make more space for your icons in taskbar and that option is to make you icons smaller. To do that:
Step 1: Right click on taskbar and choose Properties
Step 2: Under Taskbar appearance you should see check box Use small icons, check it and save changes by clicking Ok.
Step 3: Now unlock your taskbar and move your mouse pointer at the edge of you taskbar where you should see a resize pointer.
Step 4: Then left click with your mouse and drag your taskbar border up and your taskbar should spread giving your icons much more space.
For those of you who do not find convenient having your taskbar located at the bottom of your screen you can move him anywhere you want, to the right, left or top of your screen. To do that:
Step 1: Right click on your taskbar and make sure Lock the Taskbar is unchecked.
Step 2: Click on Taskbar with your left mouse and drag at the side of screen you want
Step 3: Release your left mouse. Once you placed your taskbar at desired location lock your taskbar again.
You can also Auto hide your taskbar when it’s not in use:
Step 1: Right click on taskbar and choose Properties
Step 2: Under taskbar appearance make sure Auto-hide the taskbar checkbox is checked.
Step 3: Save changes by clicking OK
Step 4: You taskbar will not disappear, to see your taskbar simply move your mouse at the bottom of your screen and you taskbar will appear again. As long as your mouse is inside taskbar it will be visible once you move your mouse outside taskbar it will disappear again.
When it comes to System Tray Organizations there is not many things to do. You can either show or hide your system tray icons. To make all icons in system icons visible do following:
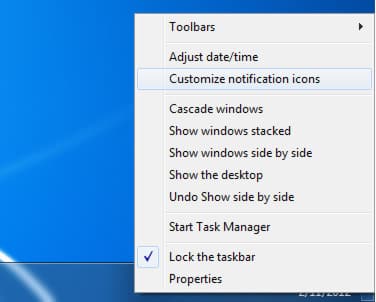
Step 1: Right click the system tray clock and from context menu select Customize Notification Icons
Step 2: From new window that appears check following check box Always show all icons and notifications on the taskbar
Step 3: Click Ok to save changes. From now on all new icons that have been added in your system tray will be visible.
You can also customize and choose only certain icons visible in system tray
Step 1: Right click the system tray clock and from context menu select Customize Notification Icons
Step 2: Inside new window you will see all available icons inside your system tray. Next to each icon you have dropdown menu from which you can choose its behaviors. There are three available behaviors:
- Show icon and notifications (Icon will always be visible in system tray)
- Hide icon and notifications (Icon will never be visible)
- Only show notifications (Icon will be visible only when your action is required)
Step 3: Once you set all behaviors click OK to save changes.
Although there are many other applications that will help you to customize taskbar e.g. Taskbar Helper, above suggestions will certainly help you get much more space and keep your taskbar and system tray more organized.
[ttjad keyword=”all-in-one-desktops”]

![Read more about the article [Tutorial] How To Backup Photos From Instagram](https://thetechjournal.com/wp-content/uploads/2013/01/advanced-a64edw87rw98.jpg)
![Read more about the article [Tutorial] How To Refresh Windows 8](https://thetechjournal.com/wp-content/uploads/2012/10/choose-refresh-pc-as8d7r1t5r4y5t4y6t4y-512x287.jpg)
