Sometimes when you are copying files from one disk to another, it may happen that you get an error message telling you that the destination disk is “Write Protected”. This protection can also be applied in USB drives. This tutorial will show you how to remove this protection using Windows 8 in order to copy files on drives.
![]()
Before we get to the actual write protection removal process, let me explain why this protection may be activated on your USB drive.
1. First reason is because of virus attacks.
2. Second and most frequent is because your USB drive have a lock switch.
No matter from which of the above reasons this problem occurred, here is how to fix it.
Step 1: From your desktop press Win+R on your keyboard to launch Run window.
Step 2: Inside Run window type regedit and press Enter on your keyboard.

Step 3: If you got prompted by UAC click Yes.
Step 4: Inside Registry Editor window left pane follow this path HKEY_LOCAL_MACHINE/SYSTEM/CurrrentControlSet/Control/StorageDevicePolicies.

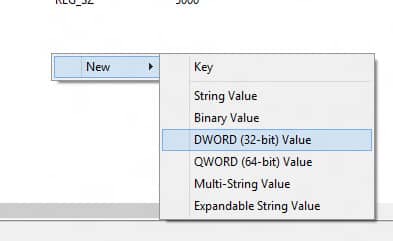
Step 5: Now select StorageDevicePolicies and inside right pane right-click on empty space, choose New ->DWORD(32 bit).
Step 6: Name it WriteProtect and assign value 0.
Step 7: Click OK to save your changes and close all active windows.
Step 8: Make sure you restart your computer, so changes can take effect.
For more such tutorials, visit our Windows 8 tutorial section.
[ttjad keyword=”microsoft”]
![Read more about the article [Tutorial] How To Set Up Custom iOS Alerts For Email Accounts](https://thetechjournal.com/wp-content/uploads/2012/11/notifications-a56sd489e7wr9e8.webp)
![Read more about the article [Tips] How To Send Attachments Without Problems](https://thetechjournal.com/wp-content/uploads/2012/04/c.webp)
![Read more about the article [Tutorial] How To Replace Laptop Hard Drive With SSD](https://thetechjournal.com/wp-content/uploads/2012/04/crucial-ssd-kit.webp)
Nevertheless, even with such a formality, they still value men’s unique character and their opinion as the North star. †Nevertheless, you would be nicely suggested to ask yourself, “This feels so quick. A calm tone goes far with Ukrainian women dating and with guys as effectively. Their traditional values mix nicely with a trendy outlook on life, making a balanced method to marriage. Eastern European ladies are identified for their dedication to marriage and family. Well, we hope we’ve satisfied you of the immense worth an Eastern European girl would deliver as a accomplice to a relationship or marriage! What are some cultural variations I should remember of when dating a European woman? For more insightful wisdom and recommendation to help you on your international courting journey in the direction of the Slavic girl of your goals, register on Ukraine Brides Agency at this time! International Cupid permits you to get out of your stale courting routine with the people and courting venues in your area, and meet folks from different international locations and of various nationalities. She explained that the peninsula has lengthy attracted individuals who need to reside a new Age way of life with the town just an hour’s drive away. Eastern Europeans are taught from a young age that they should value household ties above all else.
Then, it’s essential to learn this information on Russian mail order wives-we are going to reply all of your questions about Russian women. Our objective is that can assist you meet a Russian bride – the best mixture of russian good friend and love associate. Each day, hundreds of thousands of ladies and men connect on-line to search out strong relationships and actual love. However, none of those are what real relationships are fabricated from. Join now and join with like-minded individuals who’re trying for somebody just like you. That often occurs if you find yourself in the initial stages of courting someone and you might be extraordinarily interested in that particular person. A: Yes, there are a lot of Eastern-European girls who are open to dating Asian men, especially when they share common interests and [url=https://www.youtube.com/watch?v=q8fSUN_U2Mo]charmdate.com[/url] values. A: Eastern-European cultures usually place a robust emphasis on household and tradition, so it is vital to respect and perceive these values. From Western Europe to Eastern Europe, traditional values discover a spot alongside fashionable ambitions and lifestyles. You’re not alone – and you’re in the right place. Have a take a look at our success tales and you’ll realise we’re right! None of which ought to take away from Wolfe and her workforce at Bumble’s success so far.
Embrace the potentialities that await and take advantage of Boo’s tailor-made features to make significant connections with European girls in search of American males. There’s a sure chemistry and compatibility that seems to naturally exist between European girls and American men. In the case of attracting a European lady, there are certain dos and don’ts that can make a difference in your dating journey. On the subject of attracting an Eastern-European girl, there are just a few dos and don’ts to bear in mind. We all have our preferences in terms of discovering a accomplice, and there’s nothing mistaken with that. It’s comprehensible to really feel like others have it simpler in relation to relationship, however Boo is right here to stage the enjoying discipline for you. But fear not, because Boo has the answer you’ve got been searching for. Boo gives a novel resolution for American males in search of European women. Yes, it’s extra about Eastern European brides who live in patriarchal societies and have old style views on romantic relationships, however even Euro brides from the Western a part of the region are still extra family-centered than American ladies basically.
Meet Russian brides if you wish to love and will stay true to your words. Finding love in a distinct segment courting group is usually a rewarding experience. Q: How can I be sure that I’m not falling into stereotypes when dating on this area of interest? Regular communication, trust, and planning visits to each other’s countries can assist maintain a wholesome long-distance relationship. A: Long-distance relationships require robust communication, belief, and a willingness to make an effort to bridge the physical distance. It’s vital to strategy these variations with an open mind and willingness to study and adapt. A: Demonstrating genuine curiosity in her culture, being open to learning about her traditions, and exhibiting respect for her values and beliefs are meaningful methods to honor her background. Q: How can I be sure that the Eastern-European girls I meet on Boo are genuinely all for a critical relationship? Join Boo at this time and start your journey towards finding love with an Eastern-European woman.