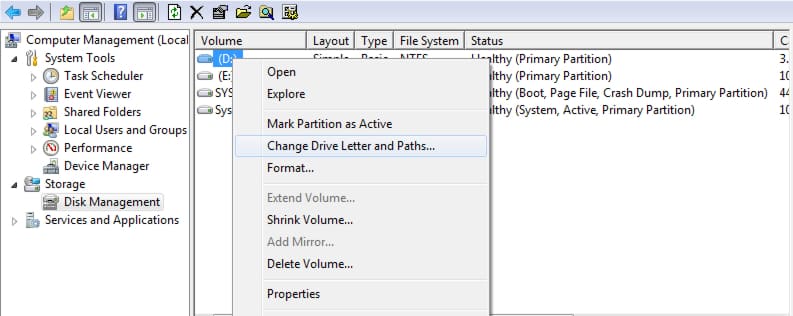
Turning a drive into a folder on Windows 7 lets you to work around system limitations and certain operations. Most of Windows 7 users could use Windows without even needing this feature or even imagining that it exist but it’s there and if you are a advanced user and you need it this tutorial will show you all steps that you need to follow.
To turn a drive into a folder on Windows 7 follow steps below
Step 1: Click Start menu and choose Control Panel
Step 2: Choose Category View from top right corner and then select System and Security
Step 3: From System and Security window choose Administrative Tools located at the bottom of the window
Step 4: In the Administrative Tools window, double-click on the Computer Management icon.
Step 5: In Computer Management window that opened click on Disk Management on the left side of the window, located under Storage.
Step 6: Right click on icon of the disk or partition you want to turn into a folder and from context menu choose Change Drive Letter and Paths
Step 7: In small window that open click Add and then choose Browse
Step 8: Locate and select an empty folder that will represent the disk. If you folder is not create yet simply click New Folder button and your folder will be created automatically
Step 9: Finally click OK three times and you are done.
[ttjad keyword=”microsoft”]


![Read more about the article [Tutorial] How To Root Samsung Galaxy Note 10.1 By Installing Custom Recovery](https://thetechjournal.com/wp-content/uploads/2013/01/auto-root-as5d465ew4r6w5e4r.jpg)
![Read more about the article [Tutorial] How To Lock Screen Rotation On Surface with Windows RT](https://thetechjournal.com/wp-content/uploads/2013/01/choosesdasddsadssssssss6we5.jpg)
![Read more about the article [Tutorial] How To Change Home Button Click Speed On Your iDevice Running iOS 6](https://thetechjournal.com/wp-content/uploads/2012/11/general-settings-ios-6-a6s5d4a687e98we.jpg)