Since Windows XP, Windows includes basic tools for managing compressed files in ZIP format. From the explorer, it is possible to extract files and folders within a ZIP archive and create your own archives. You can group files together in a single compressed file, multiple files and folders on your hard drive. And since it is compressed, the archive takes up less space than the original files which is much easier send or upload it on the web. But Windows only supports ZIP archives and does not include advanced features such as cutting archives into several pieces, encryption and protection of archives, management of compression and use of the command line. With the free tool called 7-Zip, you will be able to add features such as creating self-extracting archive and verifying the integrity of your archives directly inside Windows Explorer. This complete tutorial will help you understand all those steps.
Before we get started make sure you download and install 7-Zip on your computer.
Create A Single Archive
The easiest way to create an archive is having all the files same folder. Note that your original files will not be changed or deleted.
Step 1: In Windows Explorer, go to the folder which you want to compress. Click with the right mouse button on that folder
Step 2: From context menu choose 7-Zip
Step 3: You have a choice between several actions.
Step 4: To quickly create an archive of your files and folder (and subfolders) in it, select Add to “folder-name.zip”. A zip file containing the files is created.
Step 5: If you intend to send Zip file by email your, you can automate this process with the creation of the archive. For that, when you right click on folder which you want to compress, choose 7-Zip -> Compress to “folder-name.zip” and email… Your mail client is then opened on a new message including your archive attachment.
Step 6: If you want more precise control over the creation of the archive, right mouse click on file or folder you want to compress and choose 7-Zip -> Add to archive. You can then select another file name, set the format for the archive, compression ratio, split the file into several pieces, define a password, etc..
Create An Archive Manually
7-Zip has a manager that will allow you to group files from different folders together in an single archive. You can also easily tune the compression. Here is what you need to do
Step 1: Launch 7-Zip by clicking its shortcut in the Start menu.
Step 2: In navigation section, browse through the folders containing the files which you want to compress and select them.
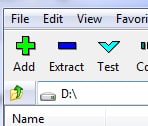
Step 3: Click the green Add button.
Step 4: In the window that opens, enter a name and select the archive format, e.g. zip or 7z which offers better compression and more features. Click the … button to change the folder where the archive will be stored. By default, the archive will be saved in the folder where the actual files is located.
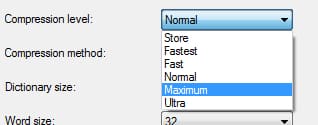
Step 5: You can choose the higher compression level which will make a compressed file smaller but in same time creation of the archive will be longer.
Step 6: If you want to trim your archive into several pieces, put them on CD or transfer them via the Internet, under Split to volumes, bytes drop down menu select the size you want. If you can’t find the size that math your needs you can also enter the size in bytes (1000000 = 1MB).
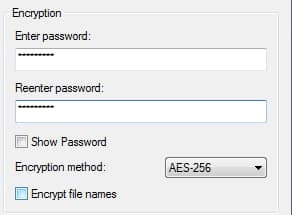
Step 7: Under the Encryption, you can enter a password to protect your archive. This password will be required to decompress the archive and retrieve your files.
Step 8: Finally, click OK.
Step 9: Your archive will be created. If you want to add additional files inside that same archive, simply open 7-Zip application again, select the files which you want to add and click green Add button.
Step 10: Click the button …
Step 11: Select the archive inside which you want to add your files and click OK.
Step 12: The new files are added to the archive.
Create A Self-Extracting Archive
.7z format proposed by default by 7-Zip is particularly powerful: it provides a very good compression ratio and offers an encryption function which effectively can protect your data. Unfortunately, it is not as widespread as the .zip format which is negatively supported by Windows for example. The people who receive your compress file in .7z format will have to install 7-zip to open it and extract the files it contains. The solution? Create a self-extracting archive. Using 7-Zip you can integrate the extraction tool inside your archive that will allow anyone to open it by double clicking on them. Here is what you need to do
Step 1: When you creating the archive (inside Add to archive window) select the file format 7z.
Step 2: Then In the Options section, select the Create SFX archive.
Step 3: Confirm with OK. Your archive and 7-Zip retrieval tool are integrated into a single executable .exe file
Step 4: Now you can share it with friends who can extract the contents by double clicking on that file.
Testing The Archive
Before deleting files that you just archived, you should test the integrity of the archive. This
test verifies that the files are not corrupt and that you can extract them.
Step 1: In Windows Explorer, right mouse click on an archive.
Step 2: Choose 7-Zip – > Test Archive.
Step 3: 7-Zip will then test the archive and to check if there are any errors. If some errors are found, do not delete your original files which you put inside the archive and re-create the archive
Compress From Command Line
7-Zip also works in command line too, and here is how to use it
Step 1: To create an archive enter following code 7z a compressedfile.ext office_documents switch
Step 2: Replace compressedfile.ext by the name of the archive which you want to create followed by its extension, .zip or .7z for example
Step 3: Then replace office_documents by the name of the folder you want to add content to the archive. You can also directly specify the file which you want to incorporate into the archive. Note that you can use the * to replace a sequence of characters. For example to add all .doc files from one folder to an archive, enter folder\*.doc
Step 4: Replace switch by the specific parameters to set up. For example -r integrate all sub-folders (and files) on the specified folder to an archive or -sfx creates a self-extracting archive.
Step 5: To create a zip archive containing all files in the Documents folder as well as those of its sub directories, the command becomes: 7z a documents.zip c:\documents -r
You are done! As you can see 7-Zip is very powerful application which will help you easily compress and send files to your friends or coworkers. If you want to share your opinions or additional suggestion/tips about this app leave your replay in comment section below.
[ttjad keyword=”all-in-one-desktops”]


![Read more about the article [Tutorial] How To Schedule Google+ Posts In Chrome](https://thetechjournal.com/wp-content/uploads/2012/05/google+-do-share-logo-512x157.jpg)
![Read more about the article [Tutorial] Test Your Computer For Gaming – No Software Required](https://thetechjournal.com/wp-content/uploads/2012/05/run-game-logo.jpg)
![Read more about the article How To Scan QR Codes With Any Smartphone [Android + Apple]](https://thetechjournal.com/wp-content/uploads/2019/01/barcode-cellphone-close-up-278430-512x273.jpg)