Power consumption is always a matter of concern for the Smartphone users, especially for high-end mobile phones like LG G3 or G3 S. Even manufacturers are also trying to find a stable solution for this with the inclusion of thin and long lasting batteries possible so far and modification of batteries and innovation of using new sustainable techniques in the batteries. To cop up with the difficulties of draining battery charge, some in-built software solution has been provided by the manufacturers. For Android devices, Android comes up with some user dependant option which actually alerts the users to minimize his or her usage as much as possible except the needed apps to be running until further recharge.
The main contributor of draining batter charge is actually the increasing features of the Smartphones and complex apps which needs higher memory (RAM). As day by day the demand of those apps and features are mounting, the use of Battery Saving Option has been increasing which a useful tool is provided by Android for the incorporated devices. But while using this feature you have to keep in mind that some essential features cannot be used that time. You can also manually choose the applications which you don’ want to use while Battery Saver is ON.
This tutorial is going to help you to turn on Battery Saver option and the other customization you may choose by your own. Please follow the below steps if you don’t know how to do it.
Step 1: Go to “Settings”.
Step 2: Tap on “General” subcategory under “Settings”.
Step 3: Scroll down and go to “Battery” option.
Step 4: You will find many options like your current battery percentage, option for battery percentage to show in the status bar, help etc. Tap on “Battery Saver” option.
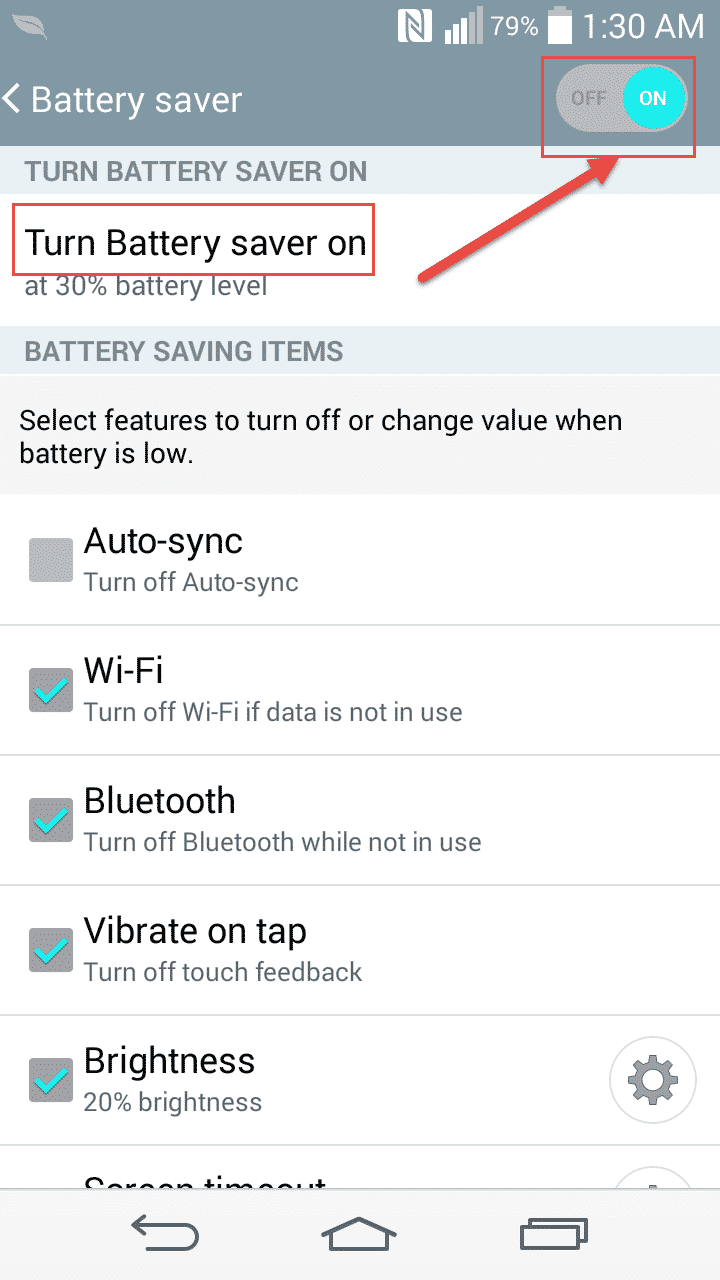
Step 5: Turn On Battery Saver which you will find in the top right corner of the window (Not the Status bar). An icon will be shown in the status bar in the top left corner of the status bar though which you can directly access to the “Battery Saver” option later on from any point of time.
Step 6: You can choose the Battery saver option to be activated at your desired level of battery discharge. To do that you have to tap on “Turn Battery saver on” option. A popup will be up there showing the below options –
# Immediately
# 10% battery
# 20% battery
# 30% battery
# 50% battery
Step 7: There are some customized option for you where you can choose which options you want to be off when Battery Saver is on. You can find all the options scrolling down the below. These options are –
# Auto-sync
# Wi-Fi
# Bluetooth
# Vibrate on tap
# Brightness – You can change the brightness level here when Battery Saver is on.
# Screen timeout – You can change the screen timeout here when Battery Saver is on.
# Notification LED
# NFC – only available in LG G3, not is G3 S
To deactivate or change state (Brightness or Screen timeout) any of these options check the box in the left.
Let us know in comments if you find this guide helpful!
[ttjad keyword=”android-device”]


![Read more about the article [Tutorial] How To Organize Multiple Inboxes In Gmail](https://thetechjournal.com/wp-content/uploads/2012/03/gear-icon.jpg)
![Read more about the article [Tutorial] How To Root Samsung Galaxy Note 10.1 By Installing Custom Recovery](https://thetechjournal.com/wp-content/uploads/2013/01/auto-root-as5d465ew4r6w5e4r.jpg)
![Read more about the article [Tutorial] How To Protect Windows From Java Security Problems](https://thetechjournal.com/wp-content/uploads/2013/03/java-windows-ttj-logo-512x205.jpg)