When ever you want to unplug/disconnect your USB drive or external hard drive from your desktop or laptop computer, from Windows system tray you always need to choose Safely Remove Hardware. The main reason why you should do this is to make sure Windows is not busy reading from or writing to the drive when you want to remove it. If you do this without using Safely Remove Hardware option you could damage your drive. However with just few simply modifications in Windows you can easily bypass this options and avoid those extra click when you are removing your drive.
On some computer this option may be enabled by default so this can be a good guide to find out if it is enabled or not. To get started follow steps below
Step 1: Plugin your USB Drive into your desktop or laptop computer, then click Start menu a inside search field type device manager
Step 2: Press Enter on your keyboard and Device Manager window will open
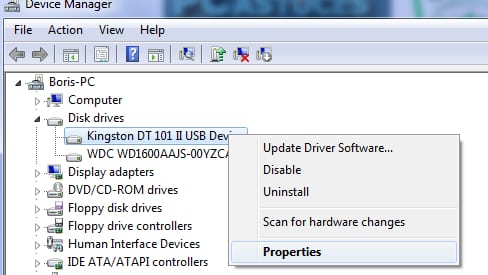
Step 3: Expand Disk Drive tree and locate your external removable drive. On my computer for example its called Kingston DT 101 II USB Device
Step 4: Right mouse click on that removable drive and from context menu choose Properties
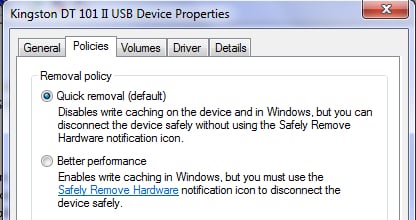
Step 5: Now choose Policies tab
Step 6: In this new window you should have two options
- Quick Removal (Default)
- Better Performance
Step 7: If first option Quick Removal is selected you don’t have to make any additional changes and simply close the window. Otherwise if it’t now selected, do so and then click OK to save changes.
Next time simply unplug your external USB drive ir hard drive without any worries that you may damage him or its data.
[ttjad keyword=”portable-hard-drive”]


![Read more about the article [Tutorial] How To Change Product Key In Windows 8](https://thetechjournal.com/wp-content/uploads/2012/10/run-win-8-window-as5d465r46r54t.jpg)
![Read more about the article [Tutorial] How To Show Extensions For Known File Types In Windows 8](https://thetechjournal.com/wp-content/uploads/2012/07/search-win-exolorer-a65s4das1d.jpg)
![Read more about the article [Tutorial] How To Update Your iPhone or iPad Software Over The Air](https://thetechjournal.com/wp-content/uploads/2012/03/ios-update-logo-512x288.jpg)