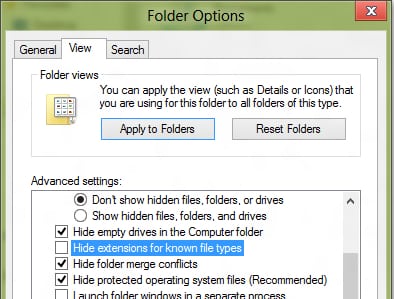
As much as I can remember in almost every version of Windows (correct me if I’m wrong) Microsoft is hiding files extensions in order to protect them from average user who may accidentally rename them to unknown file type. When it comes to Windows 8, Microsoft didn’t make any exceptions and you are still not able to see those extensions but with few modifications you can easily make them visible and in this tutorial I will show you how to do that.
To get started follow steps below
Step 1: Press Win + W on your keyboard to bring Charm menu and choose App from right pane
Step 2: Inside search box type explorer and from left pane results choose Windows Explorer
Step 3: When Windows Explorer opens, from ribbon navigation select View tab
Step 4: Now choose Options and from drop down menu select Change folder and search options
Step 5: When new window opens select View tab and then make sure that you uncheck the box in front of Hide extensions for known file types.
Step 6: Click OK two times to save your changes.
From now on all your files will have visible extensions next to their names.
[ttjad keyword=”windows-tablet”]


![Read more about the article [Tutorial] How To Reduce Hard Disk Space Used By Windows System Restore](https://thetechjournal.com/wp-content/uploads/2012/04/hdd-space-restore-point-space.jpg)
![Read more about the article [Tutorial] How To Recover Deleted Photos From Memory Card](https://thetechjournal.com/wp-content/uploads/2012/11/enable-deep-scan-recuva-as5d48e9w7r98we-512x213.jpg)
![Read more about the article [Tutorial] How To Downgrade Your iPad 2 From iOS 6.x to iOS 5.x](https://thetechjournal.com/wp-content/uploads/2013/01/ios6-ios5-ipad-2-ttj-logo-512x211.jpg)