In one of my previous how to tutorial I showed you how you can speed up your Mozilla Firefox while surfing online. However, that is not the only way, and there plenty other ways to boost your web browsing speed and in this tutorial I will show you how to use Google Public DNS on your Windows computer which will as final result a slight speed up. The good thing about this, is that you won’t need to make any changes to your browser and these changes will automatically apply to any browser whether you are using Chrome, Firefox, Opera, Safari or Internet Explorer.
What DNS do is that he translates the IP address to an easy to remember name and Google Public DNS provides a faster way to your websites faster. To get started follow steps below
Step 1: Click Start menu and choose Control Panel
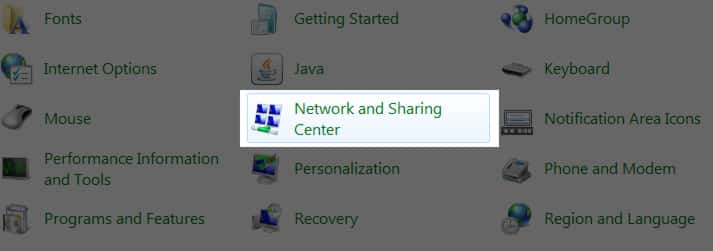
Step 2: Choose Large Icon view and then click on Network and Sharing Center
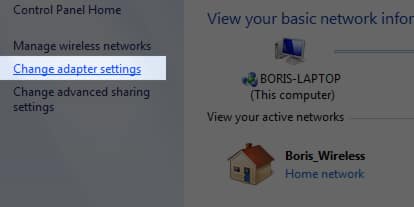
Step 3: From left side of the window click on Change adapter settings
Step 4: In Network Connections screen, right click on Local Area Connection icon and from context menu choose Properties
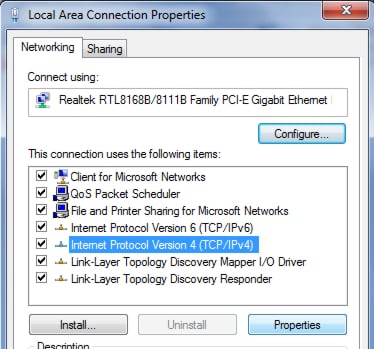
Step 5: A small window will open. Use scrollbar on the right, find and select Internet Protocol Version 4 (TCP/IPv4)
Step 6: With Internet Protocol Version 4 (TCP/IPv4) selected/highlighted click on Properties button
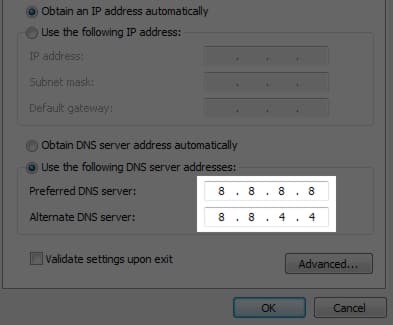
Step 7: Under General tab, at the bottom of new window select Use the following DNS server addresses and add following numbers
- Preferred DNS server: 8 . 8 . 8 . 8
- Alternative DNS server: 8 . 8. 4 . 4
Step 8: Click OK to save changes and close all other windows
Step 9: Open your web browser and open any web page. You should notice that pages are opening much faster now especially if you are using Google Chrome.
[ttjad keyword=”all-in-one-desktops”]


![Read more about the article [Tutorial] How To Share Your Internet Explorer Bookmarks Between Several Computers](https://thetechjournal.com/wp-content/uploads/2012/10/ie-bookmarks-share-ttj-logo-512x211.jpg)
![Read more about the article [Tutorial] How To Activate NumLock Upon Boot In Windows 8](https://thetechjournal.com/wp-content/uploads/2013/01/2-ok-sa5d46e4r65we4r6ew.jpg)
![Read more about the article [Tutorial] How To Stream Media From Any Computer/Mac In Your House To iOS iDevice](https://thetechjournal.com/wp-content/uploads/2012/03/zumocast-install-iphone.jpg)
bronto email marketing [url=https://otvetnow.ru]https://otvetnow.ru[/url] web design lead generation