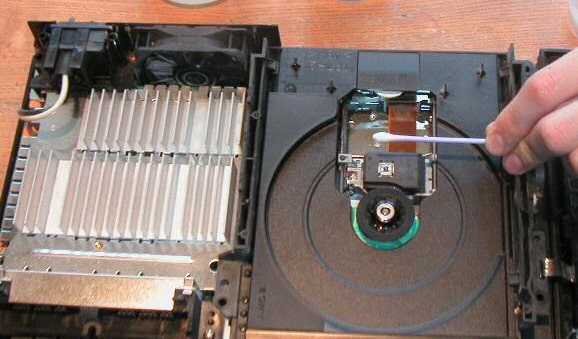
Although many people download content for their PlayStation online and maybe don’t even use a disc reader, there are still some people who love to have a physical disk and install games, watch movies, listen music etc… from DVD. If you are one of those users and you faced with a problem and your PlayStation takes much longer than usual to read a DVD or he is not reading them at all, then your PlayStation laser lens need to be cleaned or in worst scenario they are broken and you will need to replace it. In this tutorial I will show you all steps that you need to follow in order to enable your PlayStation 3 read DVDs again.
Taking the PlayStation’s console separately
To be able to repair our PlayStation laser eye we will need to resemble it to be able to access to inner parts such as the laser. To get started follow steps below
Step 1: In the first step, you need to remove the warranty sign/sticker on the part of the ps3 and then eliminate the black quadrangle from the bottom.
Step 2: Now take a screwdriver and remove the screw and then slide the cap off.
Step 3: Remove the 2 clips and all 8 screws and then lift of this entire part of the PlayStation to reveal the inside of your PlayStation.
Step 4: Take the blu-ray device from the backside. Basically, this is on the very right part of the ps3. Here you should be careful about one point, not haul too much because it is still joined to the console.
Step 5: Now make sure you remove all of the wires or cables that are attached.
Step 6: In this step, you need to move the PlayStation’s console to one part, just leaving the drive.
Step 7: In this step, turn the drives upper-side down.
Step 8: Remove all screws from the main circuit board very carefully in a clockwise movement by remembering your beginning point. After taking every screw then organize them in a fresh separate spot in the way they were removed to make it simpler to put them again together.
Step 9: Take out the last 2 screws from the underneath of the device or drive and preserve these subsequently to the others.
Step 10: Disconnect the cables linked to the main circuit board. Must need to give some extra concentration on the little cable or wire that is joined at the face. This may snap quickly, so carefully try to remove it out.
Step 11: Remove the main circuit board and take out the outer case of the blu-ray device or drive.
Step 12: Take out the white plastic ring by hand.
Step 13: Remove all screws from this part and open the shell.
Step 14: Take out the cables joined to the laser part.
Step 15: Remove the screws from the lens part in order to remove it.
Clean the PlayStation’s lens
Step 1: Place the lens. Remember, it is blue and little and is on the device among the 2 rails.
Step 2: Wash the Q-tip very carefully in the friction alcohol, press the end in order to deplete the excess because only a little amount is required.
Step 3: Polish the PlayStation’s lens very softly about two minutes.
Step 4: Gently polish the dry part of the Q-tip, basically on the lens about two minutes.
Swop the laser item
Step 1: Set the new lens item, in the place where the older one utilized to be.
Step 2: Set all of the screws again into the previous position.
Step 3: Rejoin the wires to the part.
Repair the Console
Step 1: Lock the envelope with screws. You should be careful about the place of the screws. All of the screws should be in the same place as they before.
Step 2: Set the white plastic round again in the same position.
Step 3: In this step, you need to set the main circuit board again onto the device or drive and attach the 4 wires. Be careful about the little cable.
Step 4: Glide the cover under the main circuit board and then clip it again into same position.
Step 5: Set all of the screws back in the same place and then need to set according to the clockwise motion in the same way you have unscrewed.
Step 6: Set the last 2 screws at the reverse ending part of the drive.
Step 7: Set the blu-ray device or drive again into the PS3 and then connect in the 2 wires that you have disconnected previously.
Step 8: Set the indoor cover back on top.
Step 9: Set all of the eight screws that you have unscrewed back in the same position also the two clips.
Step 10: In this step, you need to glide the very top of the removed console back into same position.
Step 11: In this last step, you need to set the last screw at the part of the PS3 and then little push the black quadrangle over the top.
You are done! If you had any problems with your PlayStation 3 Laser Eye this will surely help you fix it.
[ttjad keyword=”ps3″]


![Read more about the article [Tutorial] How To Jailbreak Your iPod Touch 4G Using RedSn0w – Windows](https://thetechjournal.com/wp-content/uploads/2013/01/iPod-Touch-4G-1.jpg)
![Read more about the article [Tutorial] How To Protect Sensitive Documents – Windows 7](https://thetechjournal.com/wp-content/uploads/2012/04/encrypt-exe-512x191.jpg)
![Read more about the article [Tutorial] How To Run Control Panel Tools Of Windows From DOS Command Prompt (cmd)](https://thetechjournal.com/wp-content/uploads/2012/02/control-panel-commands-cmd-512x259.jpg)