Give a boost to your laptop by replacing the hard drive with a SSD which is faster, quieter and save more energy, while recovering your system and your data. By putting Windows on an SSD, the startup and shutdown will be faster, as well as the responsiveness of your system will be increased. In this tutorial I will show you how to replace your existing hard drive with SSD, transfer your entire Windows operating system and other data. Since laptop hard drive is 2.5 inch, it will be easy to replace it with an SSD that is the same size.
SSDs are often delivered with a cloning tool which will help you to easily transfer your data from old hard drive to SSD. To be able to perform this operation, your data from hard disk should not weigh more than 85% of the capacity of the SSD. You may need to transfer your documents (photos, movies, music …) on an alternative storage medium as an external hard drive, DVD, etc… For this purpose I suggest you to buy a Crucial M4 SSD because in same package with your SSD you will get a CD with cloning tool and a USB cable.
Make room on your hard drive
At first, you must free up space on your hard drive to transfer your data on the SSD. This will also allow you to copy your data faster on the SSD.
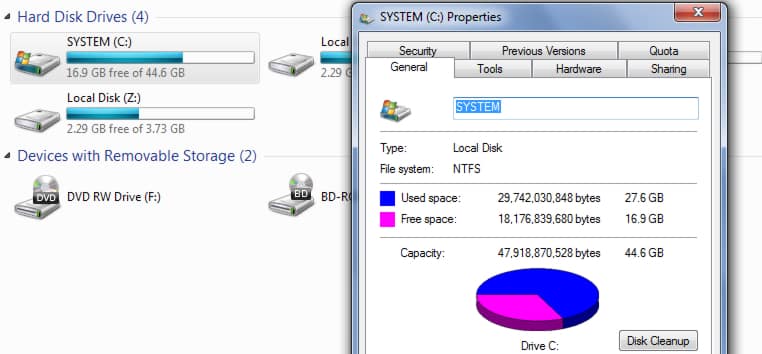
Step 1: To find out the size occupied on your current hard drive, double click the Computer icon.
Step 2: Click right mouse on your hard drive and choose Properties.
Step 3: The Used Space field shows you the space currently used by your data. Be sure to use less space than the size of your SSD in order to transfer everything over.
Step 4: If you occupy too much space, move your documents to an external hard drive or on DVD and uninstall software and games you have.
Transfer your system on the SSD
The cloning software that comes with the SSD works with all operating systems: Windows, MacOS, Linux. It will allow you to get a perfect copy of your original hard drive onto the SSD. You find your software, settings and documents.
Step 1: Turn off your computer.
Step 2: Connect the transfer cable to the SSD.
Step 3: Plug the other end of the cable into a USB port of your computer.
Step 4: Start your computer and insert the disk with cloning software included with your SSD.
Step 5: Boot from the CD. To do this, right from the start, press the F1, F2, F12 or Del depending on your computer. A message is typically displayed on the screen.
Step 6: In the menu that appears, select your CD with the arrow keys and press Enter.
Step 7: The computer boots from the CD. Click on Accept.
Step 8: Click the Let’s Get Started.
Step 9: Initially select the source disk, that is to say, the internal hard drive to your laptop and click Next.
Step 10: Then select the destination disk, that is to say the SSD and click Next.
Step 11: The software will automatically adjust the size of your scores to those of your SSD. If your SSD is bigger than your hard drive, it will be expanded accordingly. If it is smaller, it will be reduced to the extent of the available space. If you want to manually set the new partition sizes, click the Advanced button. Then click Next.
Step 12: Click Start Clone.
Step 13: Then click on Start copying.
Step 14: The copy begins. Note that this may take several tens of minutes depending on the size of your hard disk and SSD.
Step 15: Finally, click on Quit EZ Gig IV once copying is complete.
Step 16: Remove the cloning software disk from your drive and turn off your computer.
Replace your HDD with SSD
Now that you’ve copied your entire system and your files on the SSD, you’re ready to replace your hard drive with SSD in your laptop. To get started follow steps below
Step 1: Turn off and unplug your laptop.
Step 2: Remove the battery.
Step 3: Locate the access door to the hard drive at the back of your laptop.
Step 4: Remove the screws and open the hatch.
Step 5: If the HDD is in a box attached to the computer, unscrew it.
Step 6: Disconnect the hard drive by pulling back.
Step 7: Remove the case and the hard drive.
Step 8: Remove the hard disc from the case.
Step 9: Take the SSD, place it in the case of hard drive and put screws back on.
Step 10: Put the box in the laptop.
Step 11: Slide it firmly to connect it to SATA and power ports.
Step 12: Replace the screws on. Replace the cover and screw.
Step 13: Replace the battery in place, turn your laptop and plug it.
Step 14: You can start it. Windows starts normally, the SSD is immediately recognized.
Step 15: Restart your computer when Windows asks you.
Step 16: You will find Windows, your software and documentation as they were previously on your hard drive.
Step 17: You can then completely reuse the old hard drive of your laptop by turning it into an external hard drive.
[ttjad keyword=”portable-hard-drive”]


![Read more about the article [Tutorial] How to Access The New YouTube Layout From Any Browser](https://thetechjournal.com/wp-content/uploads/2012/10/new-youtube-tth-logo-512x257.jpg)
![Read more about the article [Tutorial] How To Update OCZ SSD Firmware](https://thetechjournal.com/wp-content/uploads/2013/01/ocz-drive-as65d46w5e4r6w5e4re65w-512x235.jpg)