If you frequently print 2 or 3 types of documents and each requires their own settings, it can be tedious to specify printer settings each time you change the document type. To save time, you can install a virtual printer for each print you make using the correct settings and giving them a different name. For example you can set a printer Draft, another Picture and a third Document and then use each of them depending of print type you need. Even if you have only one physical printer, Windows will list several printers with these settings and then you can select the printer for the type of printout you want. Follow this tutorial to find out how to perform this under Windows 7.
Install multiple printers
Even if you only have one physical printer, in Windows 7 you can add new printer as many times as you like. This will allow you later to dedicate a printer to each setting.
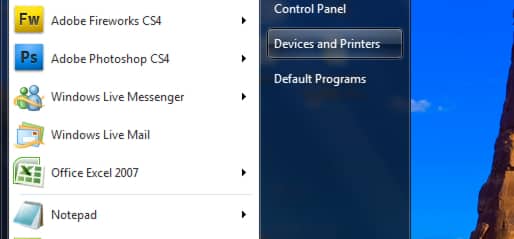
Step 1: Click the Start button and then click Devices and Printers.
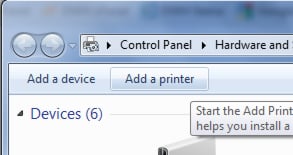
Step 2: Click Add a printer.
Step 3: Then specify if your printer is connected to your computer via USB (Add a local printer) or if it is connected to your computer via Ethernet or Wi-Fi (Add a network, wireless or Bluetooth printer).
Step 4: Printer is connected are then detected. Select your printer and click Next.
Step 5: Windows informs you that the driver is already on your computer. Select Use the driver that is currently installed and click Next.
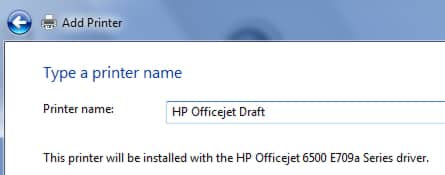
Step 6: Enter a name characteristic of settings that you will give your printer, e.g. HP Officejet Draft and click Next
Step 7: Wait for few seconds and then select that you want to share this printer (if you want to allow other users in network have access to this virtual printer then select second option) and then click Next
Step 8: Make sure you uncheck the field Set as the default printer and then click Finish
Step 9: Then repeat the operation by adding as many printers as desired. Be sure to name them in order to identify them quickly.
Define printer settings
You will now customize the default settings of each printer. The printer [Draft] for example automatically prints in black and white with the lowest quality.
Step 1: Go back to Devices and Printers window and right mouse click on a printer you just added.
Step 2: Click Printing Preferences from context menu that appears.
Step 3: Open the Features tab.
Step 4: Then specify the parameters specific to this printer: quality pages per sheet…
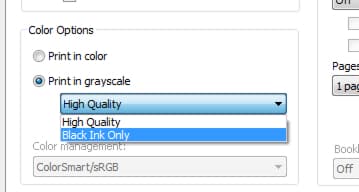
Step 5: Then under Color options choose to force printing in black and white.
Step 6: Click Apply and OK.
Step 7: Then repeat the operation to define the default settings of other printers and other settings.
Use your printer profile
Now that you have configured each with its own printer settings appropriate for a type of printing, you can use them.
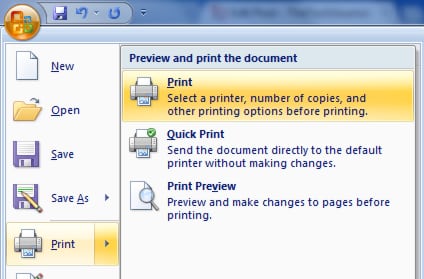
Step 1: In my example I will go to Microsoft Word and try to print my document only using Draft printer I just created.
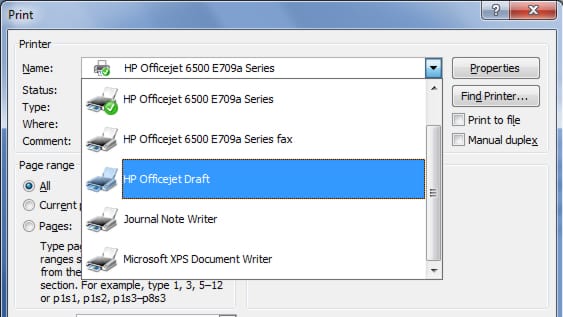
Step 2: Select the right printer, [Draft] for example and click OK.
Step 3: The document is then printed using automatic setting that you previously defined for this printer.
[ttjad keyword=”printers”]



![Read more about the article [Tutorial] How To Connect USB Flash Drives With Samsung Galaxy S III](https://thetechjournal.com/wp-content/uploads/2012/07/usb-ms-ttj-logo.jpg)
![Read more about the article [Tutorial] Guide To Fix iPhone Screen If It Turned Black & White](https://thetechjournal.com/wp-content/uploads/2016/05/iphone-stuck-in-black-white-mode-fix-610x542-512x319.jpg)
![Read more about the article [Complete Guide] How To Repair Windows XP Startup](https://thetechjournal.com/wp-content/uploads/2012/05/boot-win-xp-logo-512x213.jpg)
This is a really, really handy idea. The only problem I would have is remembering which printer was for which type of document, I’d definitely have to give each one a painfully obvious and meaningful name.
I agree with James it is a little confusing,