Windows 7 includes a new way to share data between all the computers in the house thanks to the HomeGroup. But only computers which are running Windows 7 can join the HomeGroup and enjoy the new features for sharing, playing media files remotely, etc… If you have computers running Windows XP or Windows Vista in same network with Windows 7, you can still share your files and printers with Windows 7 and in this tutorial I will show you how.
Check the working group
To be in same network, your computers running XP, Vista and Windows 7 should be part of the same workgroup.
Step 1: Click the Start button. Right click Computer (My Computer in Windows XP) and from context menu choose Properties.
Step 2: In the Settings area of the computer name, check the name of the workgroup. The default name is WORKGROUP, but you can customize it by clicking the Change Settings button.
Step 3: Make sure it is the same on other machines in the network. If you are using Windows XP, the group name is in the Computer Name tab.
Enable sharing
To enable sharing in Windows 7, you must change the settings of the Network and Sharing center.
Step 1: Click the Start menu and then click Control Panel.
Step 2: Choose a Category view and click Network and Internet
Step 3: Then choose Network and Sharing Center.
Step 4: In the left column, click Change advanced sharing settings.
Step 5: Make sure the below options are selected
- Turn on network discovery
- Turn on file and printer sharing
- Turn on sharing so anyone with network access can read and write files in the Public folders
- Allow Windows to manage homegroup connections
Step 6: Click Save Changes.
Share a folder
With Windows 7, you can easily share files and folders between computers in your network, even with Windows XP or Windows Vista.
Step 1: In Windows Explorer, right mouse click on the folder you want to share.
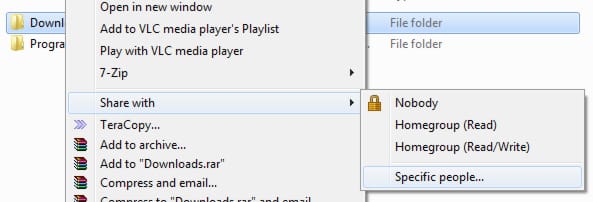
Step 2: From context menu choose Share with and then click Specific people…
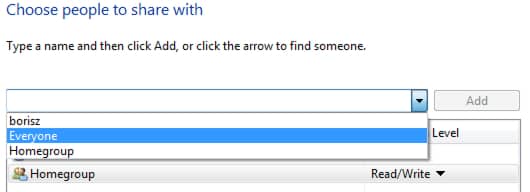
Step 3: Click on dropdown menu next to Add button and select Everyone. Now click Add.
Step 4: In the Permission Level column, choose Read/Write which will give all the right to other users in your network.
Step 5: Click Share button and finally, click Finish.
Share a printer
By sharing your printer, all other network users can use it and print their documents. Of course, make sure that your printer is always powered on or on standby mode; otherwise people in your network won’t be able to use it.
We have already covered this topic and shoed you how to share your computer under Windows 7 so make sure you read that tutorial too; you can find it on under this link.
Access the shared folders and printers
Now that you have shared files, folders and printer on your Windows 7 computer, you can access them from computers running Windows XP and Windows Vista in your LAN.
Step 1: On the PC under Windows XP, open My Network Places, Entire Network, Microsoft Windows Network and Workgroup.
Step 2: Double click on the computer icon which is running under Windows 7.
Step 3: Enter the username and password of an account on the computer with Windows 7 and click OK.
Step 4: You then have access to files, folders and shared printers.
Step 5: Double click a shared folder to access its contents.
Step 6: Double click the icon for the shared printer and click Yes. The printer is then installed on your computer.
Step 7: Next time when you are printing from your Windows XP or Windows Vista computer this printer will be visible in the list of available printers.
[ttjad keyword=”microsoft”]


![Read more about the article [Tutorial] How to Run Windows 8 Desktop On A Second Monitor](https://thetechjournal.com/wp-content/uploads/2012/10/win8-extend-screen-view-ttj-logo-512x290.jpg)
![Read more about the article [Tutorial] How To Use Google Maps When You’re Offline?](https://thetechjournal.com/wp-content/uploads/2012/11/make-available-offline-as89d7987yd4fg87o96yu4i.jpg)