If you have successfully passed a hardware test and followed my previous tutorial on how to test your computer hardware and see if its ready for your favorite video game there is one more problem you may face and which can ruin your game play. When you play video games in network (locally or on Internet), the latency is very important. It corresponds to the response time between when you press a button or move the mouse and when the desired action is executed in the game. By default Windows combines small packets into one before sending them. By disabling this feature, small packets will be transferred immediately without delay, thus reducing your latency. In this tutorial I will show you which steps you need to perform inside Windows 7 in order to make this work.
CAUTION! This can slow your file transfers. I suggest you to apply this change when you want to play a video games in network or internet and disable it when you are finished playing. To get started follow steps below
Step 1: Click the Start menu button. In the search field, type the command regedit and press Enter on your keyboard
Step 2: A Windows registry window will open.
Step 3: Follow this path HKEY_LOCAL_MACHINE/SYSTEM/CurrentControlSet/Services/Tcpip/Parameters/Interfaces
Step 4: Now expand the last value Interfaces and open the {key} where key is the identifier of your network card. To find the key, click on each value one by one: this is where your local IP address is specified so you can easily identify which {key} you need to select
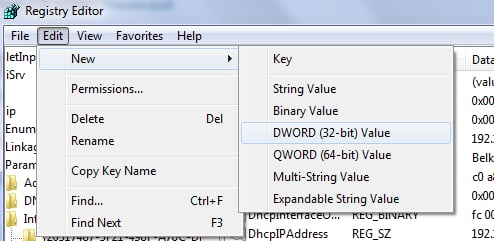
Step 5: Once you located which one is it and select it, click the Edit menu and from drop down menu choose New then DWORD (32-bits) Value.
Step 6: Name the new value TcpAckFrequency and once it’s created double click it.
Step 7: Enter 1 in the Value data field and click OK.
Step 8: Now follow this path HKEY_LOCAL_MACHINE/SOFTWARE/Microsoft/MSMQ.
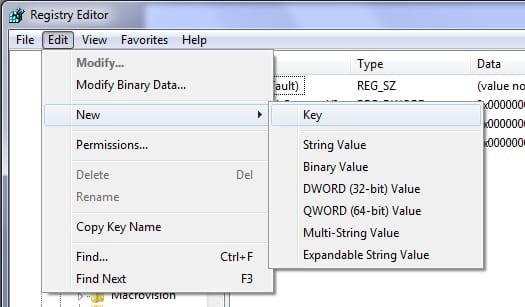
Step 9: Click the Edit menu, click New and then Key.
Step 10: Name the new key Parameters.
Step 11: Click the Edit menu, click New then DWORD (32-bits) Value
Step 12: Name the new value TCPNoDelay and double click it.
Step 13: Enter 1 in the Value data field and click OK.
Step 14: Finally close the registry editor and reboot your computer to apply changes.
[ttjad keyword=”pc-game”]


![Read more about the article [Review+Giveaway] iSkysoft Video Converter Ultimate](https://thetechjournal.com/wp-content/uploads/2013/12/scr_0-700x453-512x331.jpg)
![Read more about the article [Tutorial] How To Geotag Your Photos For iPhoto Import](https://thetechjournal.com/wp-content/uploads/2012/11/google-earth-applications-a5s4e8w7re98.jpg)
![Read more about the article [Tutorial] Test Your Computer For Gaming – No Software Required](https://thetechjournal.com/wp-content/uploads/2012/05/run-game-logo.jpg)