This year was very successful for Amazon and their tablet Kindle Fire. Their newer version Kindle Fire version comes with 7-inch display and Android ICS operating system with 16 and 32GB storage space versions. As soon as this device become available on markets, Android developers came out with their root methods. By rooting your Amazon Kindle Fire HD7 you will be able to modify any part of the device and install any other third-party apps. If you are one of those user that are willing to root their Kindle device, this tutorial will show you how to do that.
Before proceeding to follow steps below you will need to download two required files. Download Root Package from this link and then download Fastboot from this link. Save both files on your computer desktop and then continue with below steps:
Step 1: Extract all files from previously downloaded Root Package archive inside new folder.
Step 2: Now open that folder and copy su file from /system/bin/ folder and Superuser.apk from /system/app/ folder directly to your desktop.
Step 3: Again, extract all files from Fastboot archive directly to your desktop.
Step 4: Once you have all necessary files ready, use USB cable and connect Amazon Kindle Fire HD7 with PC on which you previously extracted files.
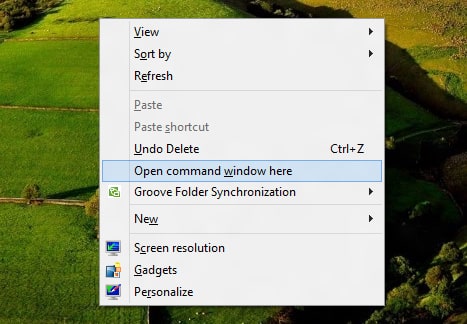
Step 5: Go to your desktop, press Shift on keyboard and then right mouse click on empty desktop space.
Step 6: From context menu the opens up choose Open command window here.
Step 7: When CMD window opens up, type below command making sure your press Enter on your keyboard after each line:
rm -r /data/local/tmp
ln -s /data/ /data/local/tmp
exit
echo ‘ro.kernel.qemu=1’ > /data/local.prop
exitadb rebootadb shell mount -o remount,rw /system
adb push su /system/xbin/su
adb shell
chown 0.0 /system/xbin/su
chmod 06755 /system/xbin/su
rm /data/local.prop
exitadb rebootadb install Superuser.apk
Step 8: Once everything is finished your Kindle Fire HD7 should be rooted.
[ttjad keyword=”kindle”]


![Read more about the article [Tutorial] How To Get @outlook.com Email Account](https://thetechjournal.com/wp-content/uploads/2012/08/more-mail-settings-outlook-online-a5sd4654o3iu10c0v.x0c.jpg)
![Read more about the article [Tutorial] How To Block All Scripts Executions In Firefox](https://thetechjournal.com/wp-content/uploads/2012/02/allow-techjournal-noscript-ff.jpg)
![Read more about the article [Tutorial] How To Rearrange Your Keyboard Layout With SharpKeys](https://thetechjournal.com/wp-content/uploads/2013/01/keyboard-buttons-replace-ttj-logo-512x219.jpg)