The commercial Chromebooks are almost here, but if you want to try Chrome OS sooner than that you can do it and every bug found by a user and reported to the system developers, is another chance to OS perfection. Unfortunately, it’s not as easy as you might think and here is how to install google chrome OS , killing tip of this OS and how to install or run it on USB………

How to Install Google Chrome OS Linux:
- Open VirtualBox, create a new virtual machine, name it, and set the Operating System to “other”. Click on “Next”.
- Set the size of base memory (RAM). I think the recommended RAM is 512 MB so I would recommend setting it that way. You can always increase the memory later if you need to.
- Next, create a new virtual hard disk. Make sure “Boot Hard Disk (Primary Master)” is checked.
- Pick the type of storage that you would want to use. I choose dynamically expandingstorage.
- Select the size of your virtual hard disk. I recommend you use at least 2GB. Click on next and proceed by starting Google Chrome OS Linux.
- After pressing the “Start” button, the “First Run Wizard” will appear to help you manage the media to use. You will have to select and add the downloaded Chrome OS Linux ISO image of course.
- The installation of Chrome OS Linux will start immediately after having selected the installation media.
- The Chrome OS Linux installer is really easy to use so just go on and finished the installation.
How To Run Google Chrome OS From A USB Drive :
First of all, you will of course need a USB drive you can use to try it out. The disk image is 2,988,442,112 bytes, so you’ll probably need a 4GB thumb drive to be able to use it. If you have any files on your USB drive that you need, be sure to back them up to a safe place because this will wipe all the data from your USB drive. You will also need a computer that allows booting from a USB drive. You’ll need to instruct your computer’s BIOS to boot from the USB drive instead of the hard drive like it normally does. When you boot up your computer, it should provide you with information as to how to bring up a boot menu. On some machines it is the F8 key and others the F12 key or some other key. If it all scrolls by too fast, some computers will allow you to pause the boot sequence by pressing the Pause key. That should give you all the time you need to read all that stuff on the screen to see if you can find out what the boot menu key is (if there is one). If you don’t see anything about a boot menu, you could also try editing your BIOS settings to boot from the USB drive. You may wish to consult your computer (or motherboard) manual on how to do this.
You will also need a little bit of luck. Chromium OS may or may not work on your computer hardware. It successfully run on two home-built frankenstein computers (with ASUS motherboards), but it did not successfully recognize the network adapter on ell laptop. All of this work may be for nothing, if it ends up that Chromium OS does not like your network adapter and you do also need a computer with a network adapter. Finally, you’ll need to download the necessary files to put Chromium OS (that’s what the open source version of Google Chrome OS is called) onto your USB drive. Download the Chromium OS for USB Torrent (Right-click and Save As). You’ll need a good BitTorrent client like µTorrent to download it. If you’re new to BitTorrent, be sure to check out our Big Book of BitTorrent. You’ll learn more than you’ll ever want to know about it. The torrent has a zip file that includes the disk image, as well as a Windows tool for putting the image onto a USB drive. The program you’ll use to create the Chrome OS USB boot disk is called Image Writer for Windows.
Steps:
Unzip chrome_os_usb.zip, and launch Win32DiskImager.exe. If you need a program to unzip the archive, you can download IZArc. If you get the warning below when you launch Image Writer, don’t sweat it. It’s looking for a floppy disk that’s not there.
Once you’ve got Image Writer running, click the folder icon and select thechrome_os.img file (it should be located in the same place where you extracted the zip file and launched Win32DiskImager.exe).
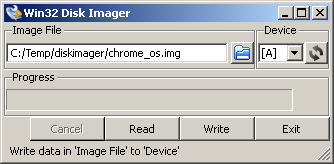
Connect your USB drive to your PC. If you have autorun enabled, you may want to wait a few seconds for your computer to do its thing. Just close whatever window may pop up. Next, click on the Device dropdown and select the drive letter that corresponds to your USB drive. Then, click Write and the program will commence writing the disk image to your USB drive.
Boot Up Chromium OS:
You’re now ready to boot up Chromium OS! You can just leave the USB drive in your machine and reboot it. When the machine boots, press the boot menu key on your keyboard. Select your USB drive from the menu. In about 10 seconds or so, you should see the Chromium OS login screen.

Login with chronos and password. This will log you in as a local user. Once you log in, you should see what looks almost just like the Google Chrome browser. If you click on the Chrome sphere in the upper left corner, you should see a Google Accounts login page telling you to log into Welcome. Log in with your Google Account.

If you do not see this page and you get a browser page that says it could not find the page requested, then unfortunately luck is not on your side. It means that Chromium OS doesn’t like your network adapter. You could still however try it out in a virtual machine if you so desire. If you were able to succesfully log in, you should then see the application page.

As you can see, it is all in the cloud. All the applications you see on the app page bring up different webpages, and everything you do takes place within the browser. In my experience, although it did boot up relatively fast, the browser tends to run a bit slow and is a bit jumpy. Although the calculator and notepad launch properly in little popover windows, the apps don’t work and nothing loads into the windows at all. The To-do List application doesn’t work either, and you get a Google.com account login page. Note, this is not the same as a Google Accounts login so you won’t be able to log in with your Google Account. The Google.com login page is only for Google employees. The Contacts application brings up a Google Talk gadget that doesn’t appear to work.
Killer tips for mastering Google Chrome:
Tip one: Keep your browsing private with Incognito.
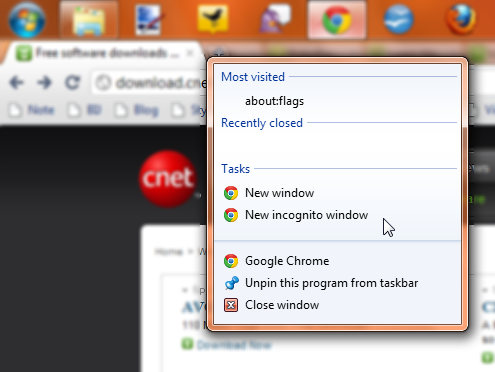
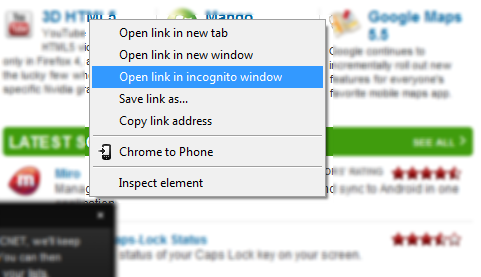
Incognito mode is a private browsing mode that turns off the regular in-browser tracking such as your history and cookies. While it lends itself well to “porn mode” jokes, it’s actually a useful tool for a heightened level of privacy, such as when conducting online banking. It’s so useful that Chrome OS uses Incognito for its Guest account log-ins, so you can share your Chromebooks with friends and not have to worry about having your tabs accidentally deleted, for example.The keyboard shortcut to launch a new Incognito window is Ctrl+Shift+N. In Windows 7, you can launch an Incognito window directly from the desktop taskbar by right-clicking on the pinned Chrome icon and choosing “New Incognito window” from Tasks. You can also open a link directly into Incognito from a regular session of Chrome by right-clicking on the link and choosing “Open link in Incognito window”.
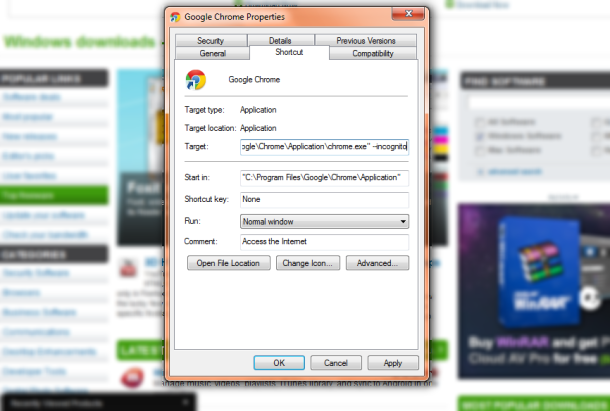
You can start Chrome in Incognito mode by default, too. Create a Chrome shortcut on your desktop, then right-click it and choose Properties. In the Target field, go to the end of the line and type ” –incognito” (space, dash, dash, incognito, no quotes), then hit the OK button. That shortcut will always launch Chrome in Incognito, and it won’t conflict with another, regular shortcut. Another essential Incognito tip is that you can toggle your installed extensions to run while in Incognito mode. Go to the Wrench icon (or Preferences on a Mac) and choose Tools, then Extensions. Enabled extensions that can run in Incognito mode will have a check box that you can tick to allow them to run. This is not the safest way to use Incognito, however, because it’s possible that the extensions will record browsing tracks that the browser won’t. Still, it’s appropriate for each user to make the decision about which extensions ought to work while the rest of the browser’s tracking methods have gone silent.
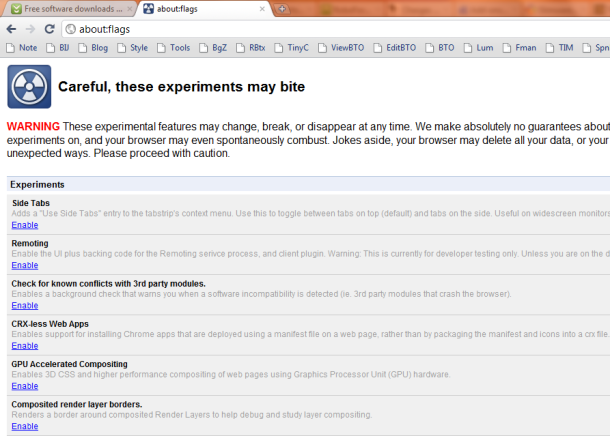
Tip two: It’s all about the “about:”
Chrome has a different set of about: functions than Firefox and it’s a good idea to memorize some of the basic ones that you can type into the location bar. One of the most important is about:flags, which provides access to experimental features. The list is constantly changing, as Chrome engineers develop new features that they want power users to play with, but that might decrease the stability of the browser as a trade-off. Currently, some of the best options in about:flags include Side Tabs for moving tabs from the top of the browser to the side, great for wide monitors; Grouping, which adds a grouping option to the tab context menu to keep related tabs together; Better Omnibox history matching, which gives a kick in the pants to the location bar’s search feature; and the various GPU-related choices. These will likely decrease your browser’s stability, but you will also see dramatic gains in browser speed, especially on Windows XP or older machines, as these flags toggle the more experimental aspects of hardware-accelerated browsing.
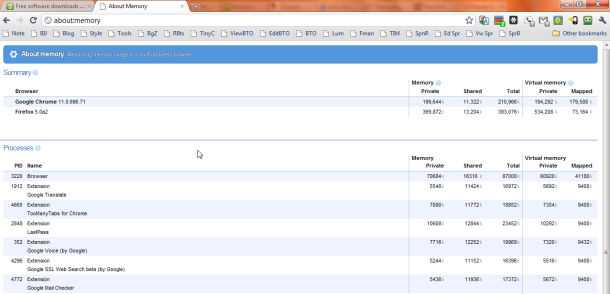
Another smart “about” to remember is about:memory. This shows you not only the memory that Chrome is using, both in its entirety and broken down into individual tab processes, but also the memory usage of any other browser you’re running at the moment. Chrome doesn’t yet have a hot key to jump you directly to the Extension manager, but it does have about:plugins, which will take you there.
Many of the rest of the about: features get deep into browser management and reveal important browser data to developers. You can always check out the full list of 18 standard about: pages, and the list of seven additional ones that will force different kinds of crashes for developers, by typing in about:about.
Tip three: Use the keyboard, Luke.
Hot key combinations not only improve finger strength and dexterity they also help you navigate faster. Chrome and the coming Chrome OS have an extensive list of hot keys, and the list of 30 hot keys below includes both basics and some of the more esoteric options.
| Hot key combo | What it does |
|---|---|
| F1 | Loads the Google Chrome Help center URL |
| Ctrl+J | View Downloads window |
| Ctrl+H | View History window |
| Ctrl+D | Bookmark page |
| Ctrl+F | Opens/Closes search box |
| Ctrl+P | Opens Print window |
| Ctrl+T | Opens a new tab |
| Ctrl+W | Closes current tab |
| Ctrl++ | Zooms in |
| Ctrl+- | Zooms out |
| Ctrl+0 | Returns page to default size |
| Ctrl+Shift+T | Re-opens most recently closed tab |
| Ctrl+N | Opens a new window |
| Ctrl+Shift+N | Opens a new Incognito window |
| Ctrl+Tab | Cycles tabs, left to right |
| Ctrl+Shift+Tab | Cycles tabs, right to left |
| Ctrl+1-8 | Jumps to tab. 1 = first tab, 2 = second tab |
| Ctrl+9 | Jumps to last tab |
| Ctrl+Shift+Del | Opens Clear Browsing Data window |
| Ctrl+Shift+B | Shows/Hides Bookmarks bar |
| Shift+Esc | Opens Chrome’s internal task manager |
| Alt+Home | Opens home page in current tab |
| Alt+D/Ctrl+L | Highlights text in location bar |
| Ctrl+Enter | Adds www. and .com to text in URL bar |
| Ctrl+Shift+V | Pastes from the clipboard without formatting |
| Shift+Alt+T | Moves focus to first tool in toolbar |
| Tab (after Shift+Alt+T) | Cycles through tools on toolbar |
| Space or Enter (after Shift+Alt+T) | Activates selected tool |
| Shift+F10 (after Shift+Alt+T) | Reveals context menu for selected tool |
| Esc (after Shift+Alt+T) | Returns focus to page |
Google has also made a full list of keyboard shortcuts you can read and you can find full google chrome OS download links, Here.
[ttjad keyword=”chrome-laptop”]

