If you are using Samsung Galaxy Note 10.1, yesterday you saw, how easily you can update your Galaxy Note 10.1 to latest Android version using Samsung Kies. Now once your device is running under newest Android version you will certainly wish to try some new on your device and that will be rooting your Samsung Galaxy Note 10.1. Since this tutorial is for beginners we will be using CF-Auto-Root to make this process simplified and in next few days I will also cover a tutorial where you will see how to root it by Installing Custom Recovery which is intended for advanced Android users.
![]()
For those who are not familiar, CD-Auto-Root is very simple rooting mechanism for stock ROMs and it’s quite useful for those Android users who want to keep their devices as close to stock as possible. By performing this procedure you don’t need to install any custom recovery on your device, which also means it’s won’t be able to install them even after rooting is done.
Also before proceeding to below steps let me note that by performing this procedure you will not lose any data from your device, however it’s better to be safe and create full Android backup.
To get started follow steps below:
Step 1: For this purpose we will be using Kies, and since you probably installed it while following our previous tutorial you can continue to next step. If you have not already done that, you can download Kies from this link and install it on your computer.
Step 2: Next download CD-Auto-Root package for your Android device from this link and then extract it in new folder on your computer. Once you extract the downloaded file you should see two files, one of them is ODIN which we will use to flash the root file on our Android device and second one is PDA file for ODIN.
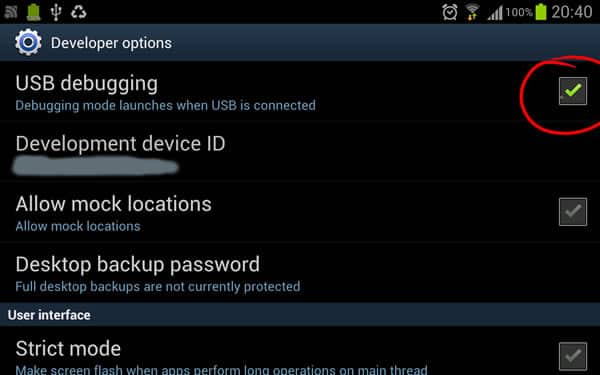
Step 3: On your Android device, go to Settings and then choose Developer Mode. In here make sure you enable USB Debugging by taping on this option once. After that reboot your device in recovery mode by pressing and holding Volume Down + Power buttons in same time.
Step 4: On your computer lunch ODIN app which you downloaded/extracted in Step 2 and then connect your Galaxy Note 10.1 with computer on which you have lunched ODIN.
Step 5: Wait for few seconds until ODIN has been detected by your device and then you should see that first gray box in ODIN has become green.
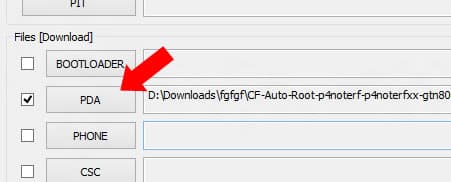
Step 6: Click PDA button and then locate second file you extracted in Step 2 which is CF-Auto-Root.tar.md5.
Step 7: Under Option section make sure that Auto Reboot and F. Reset Time are the only selected options.

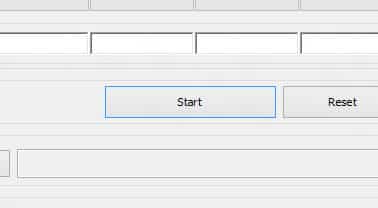
Step 8: Click Start button and ODIN will then flash the file, install Super User and then reboot your Note 10.1 device.
Once that process is done you have rooted your Samsung Galaxy Note 10.1
[ttjad keyword=”samsung-galaxy-tab”]
![Read more about the article [Tutorial] How To Restrict Access To Old Messages On Facebook](https://thetechjournal.com/wp-content/uploads/2012/11/privacy-settings-as65e498we7.webp)
![Read more about the article [Tutorial] How To Repair Windows 7 Boot](https://thetechjournal.com/wp-content/uploads/2012/02/starting-windows-7.webp)